Homemade Caramel Apples
Posted Sep 29, 2021, Updated Apr 28, 2024
This post may contain affiliate links. Please read our disclosure policy.
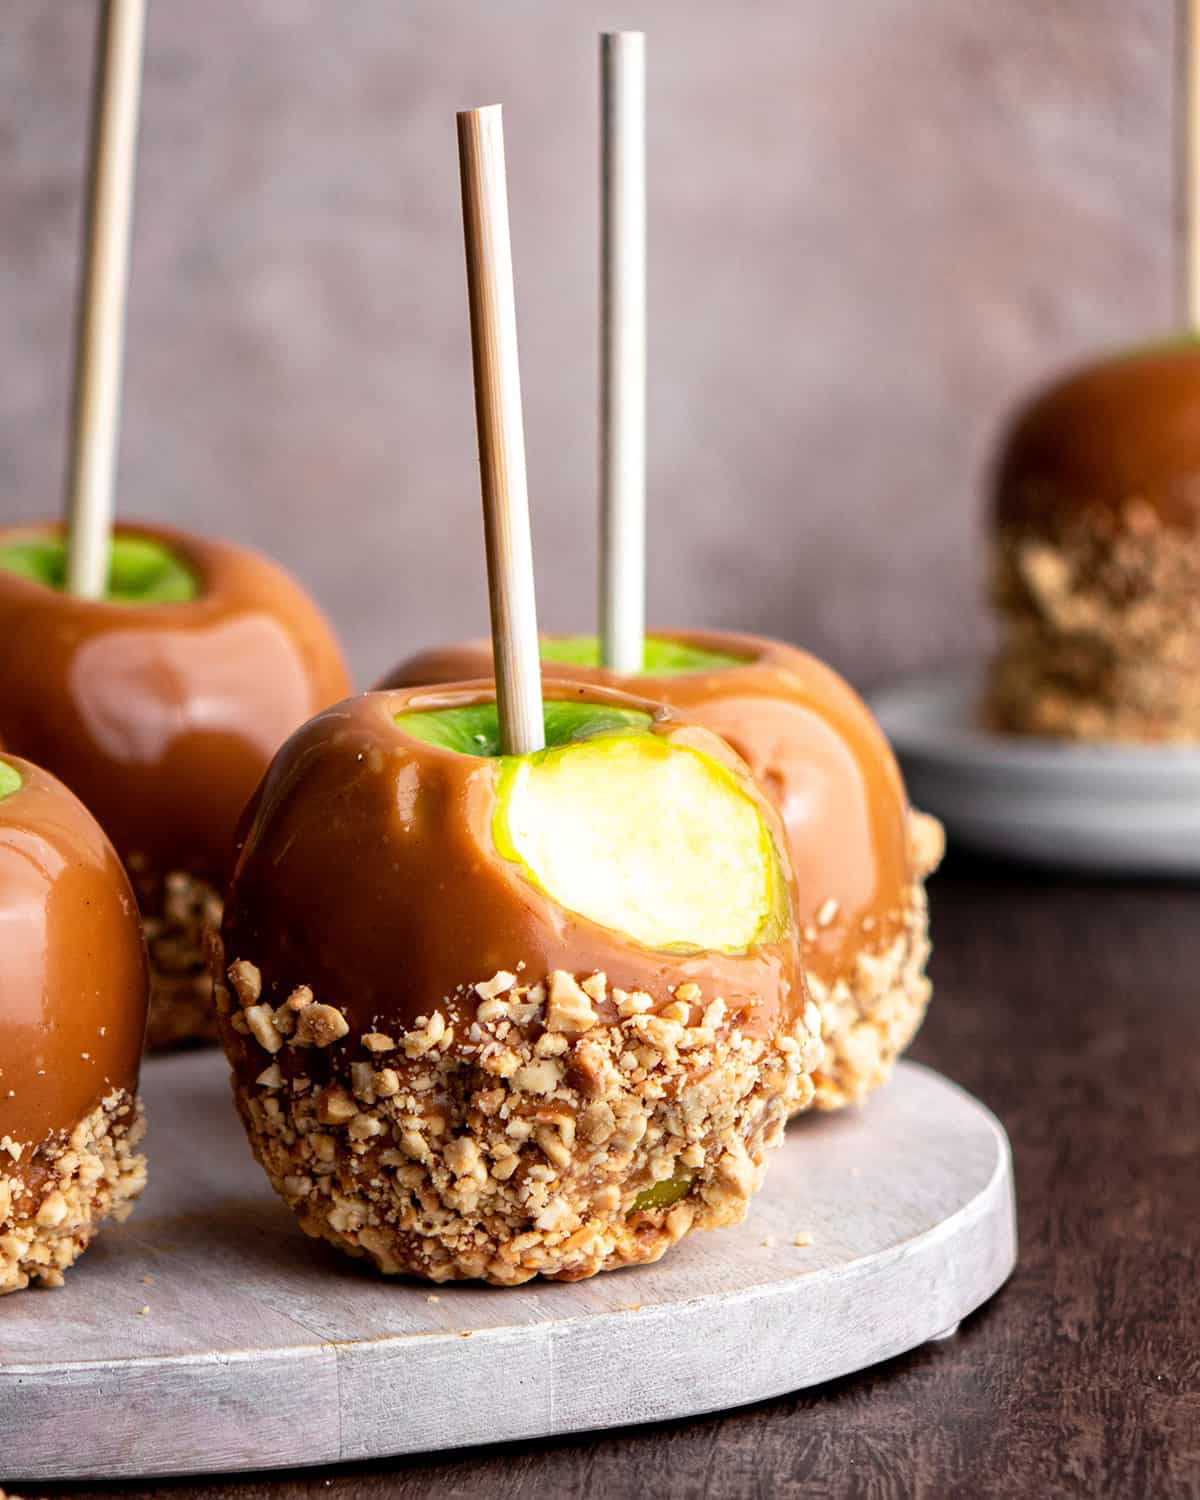
The best homemade caramel apples recipe! Tart apples are coated with a sweet and buttery homemade caramel and rolled in salty nuts for a delicious fall dessert. Learn how to make caramel apples with our step-by-step instructions & video!

My husband loves caramel apples. In the beginning of our marriage when we traveled more often (before we had 6 beautiful babies), he would get a caramel apple everywhere we went and rank them from most memorable to easily forgettable.
Well, over the years I’ve worked to perfect our homemade caramel recipe in order to make the absolute best caramel apples recipe, and now I get to share it with all of you.
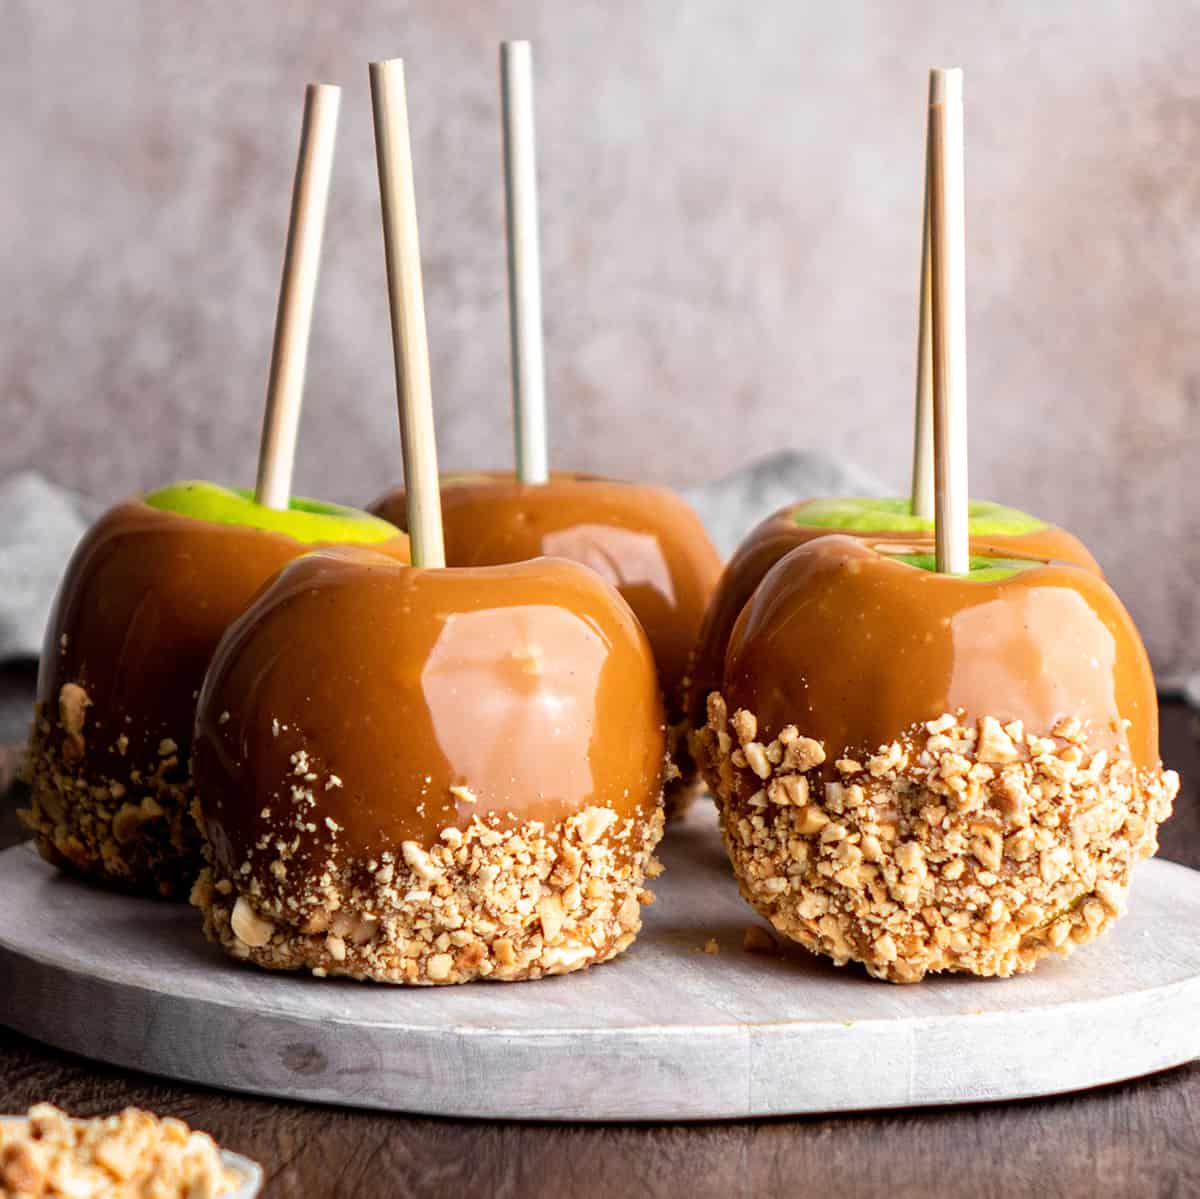
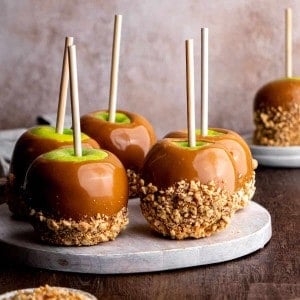
The sweet and buttery caramel coats a crisp, tart green apple and is rolled in salty nuts for a delicious fall treat.
Since caramel isn’t the easiest candy to make, I’ve included all of our tips and tricks as well as troubleshooting suggestions and a video to learn how to make caramel apples!
Homemade Caramel Apples: Ingredients & Substitutions
I recommend making this caramel apples recipe exactly as written, here are a few notes on the ingredients.
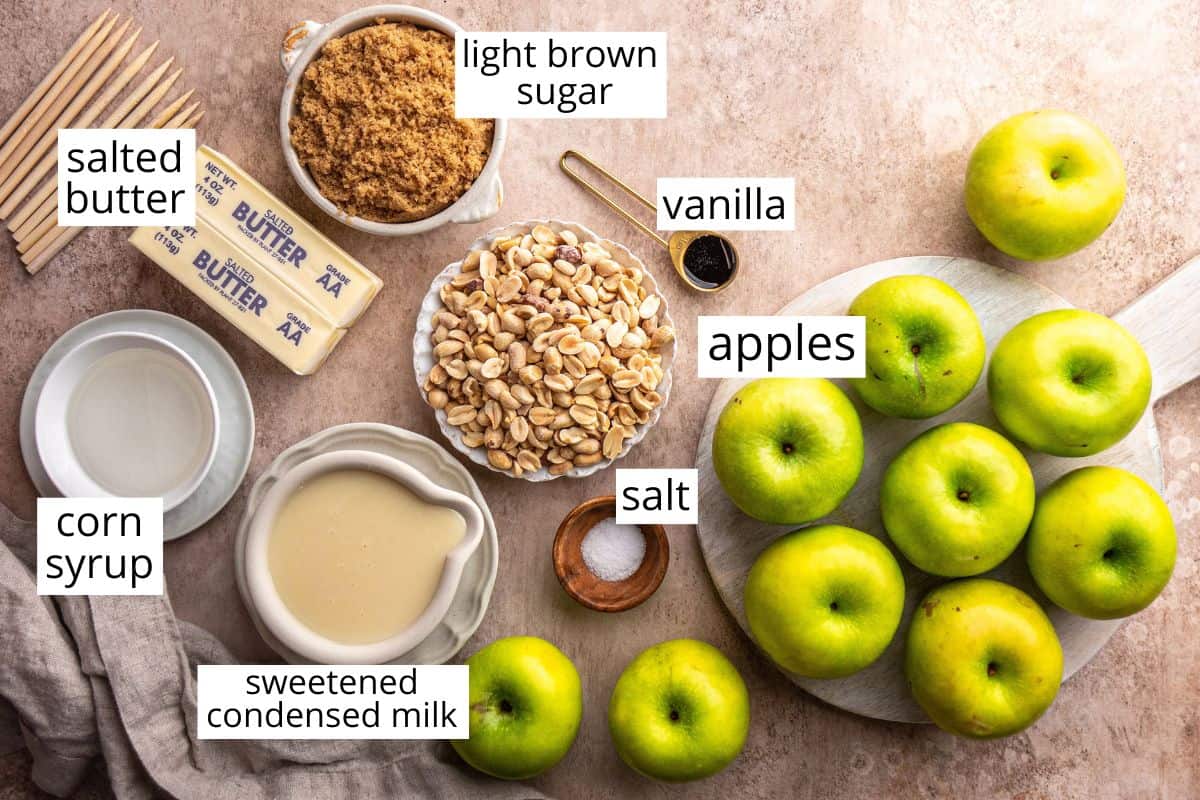
- Apples. You can choose any apple variety to make these homemade caramel apples. I prefer granny smith or pink lady apples for their tart flavor. I suggest buying organic apples that do not have a waxy coating because the caramel sticks to them better. (more on this later).
- Peanuts. I love salted peanuts, you can use any nut (almonds, cashews, pecans, etc.) or even candy like sprinkles.
- Salted butter. I always use salted butter (plus additional sea salt) when making caramel because it helps stabilize the candy mixture so the butter doesn’t separate. I don’t recommend making substitutions.
- Light brown sugar. Dark brown sugar can be used in place of light for a caramel with a more pronounced molasses taste.
- Corn Syrup. There is no substitution for corn syrup in this recipe, it gives the caramel apples a beautiful shine.
- Sweetened condensed milk. Another important ingredient that I don’t recommend substituting.
Equipment for Making Caramel Apples
There are a few key piece of kitchen gear you need to make this recipe. Be sure to have everything you need laid out and ready to go before starting, because homemade caramel apples require your full attention.
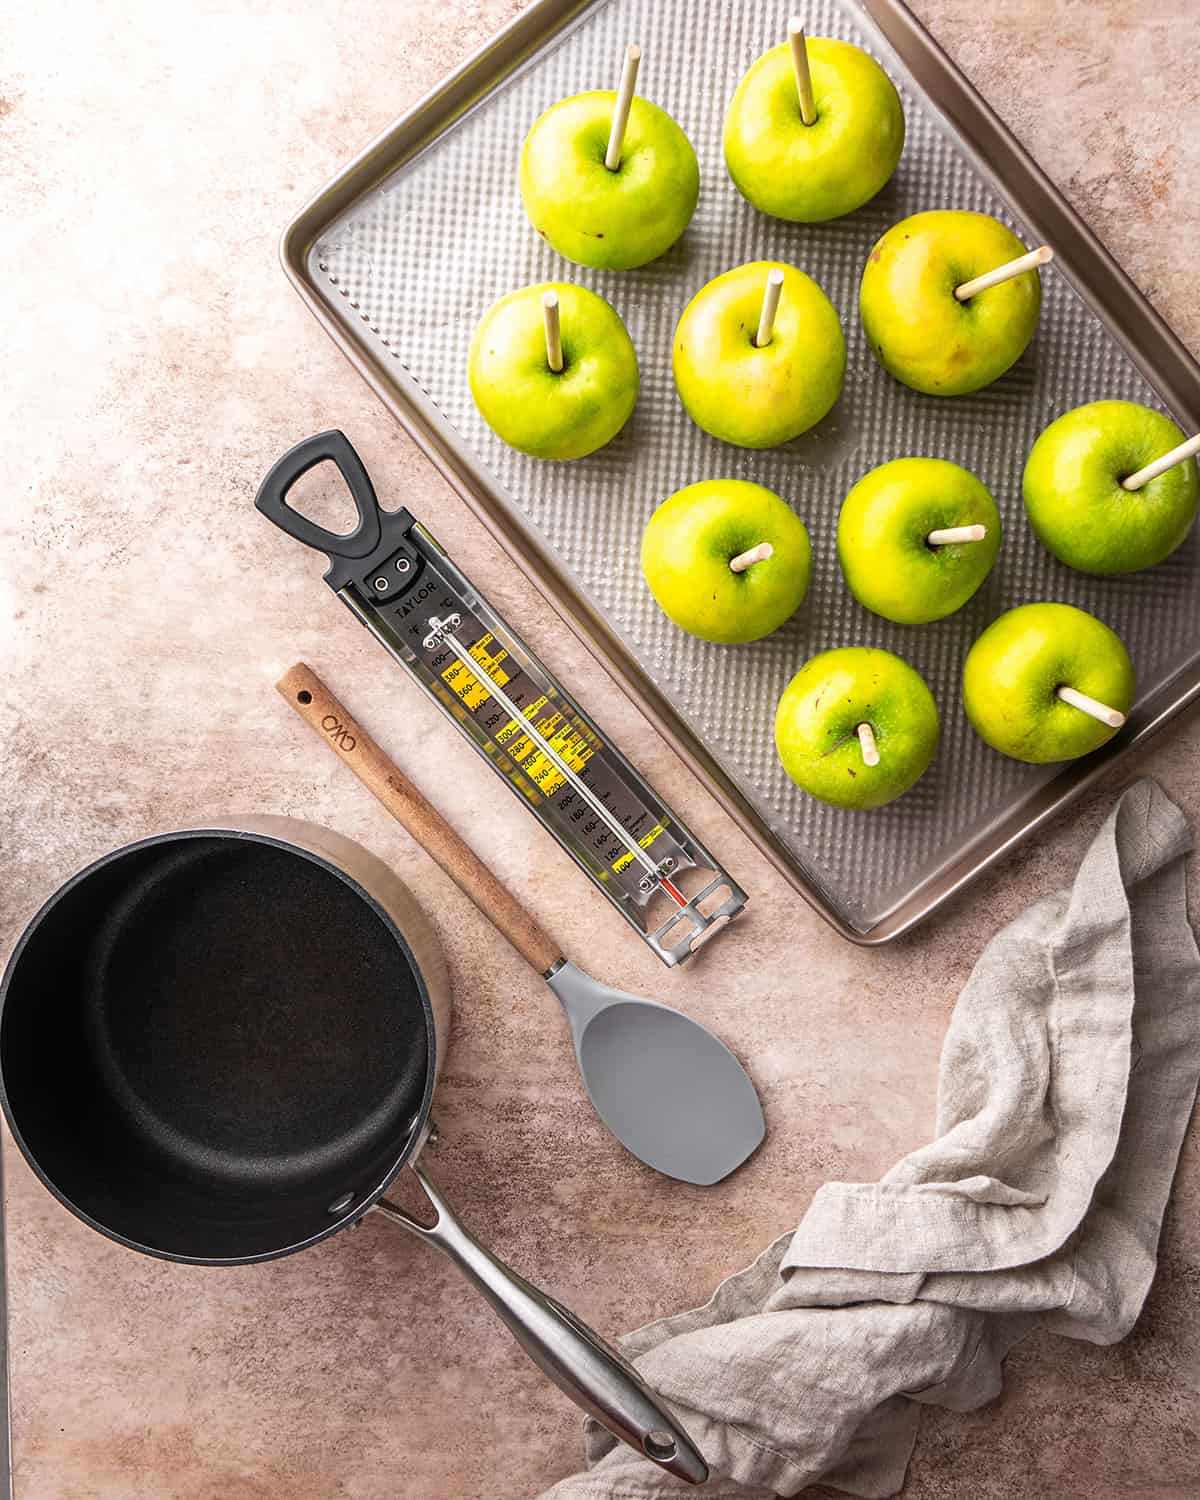
- Tall, heavy bottomed pan. This is absolutely critical when making candy, especially caramel (or toffee). I suggest a thick pot like this one, it’s 2.5 mm thick on the bottom for even heating. If you really want to splurge you could get a copper version (I bought this and love it). If you use a pot that is too thin the caramel could burn and you will end up with flecks of crystalized sugar in the candy.
- Candy thermometer. Sure, you could do the ball test to determine if your caramel is done, but that is too subjective for my analytical mind – and I never make candy without a thermometer. I use a digital, instant read thermometer for all my candy making (and meat cooking) needs.
- Wooden spoon or silicone spatula. The caramel needs to be stirred constantly, so you need a heat-proof utensil to make this recipe. I suggest a wooden spoon or high-heat silicone spatula.
- Silicone baking mat. I bought one of these just to use to make candy (these homemade caramel apples specifically). Caramel can stick to wax and parchment paper, so I suggest lining a baking sheet with a silicone baking mat to set to place the finished apples.
- Wooden Sticks. You can use sucker sticks but I love the look and functionality of these wooden skewer sticks because they have a sharp end that easily inserts into the core of the apples.
How to Make Caramel Apples
To be totally transparent, it takes practice and precision to make caramel just right. Add dipping apples into it and rolling it in nuts and I would say this is not a beginner recipe. So, I hope to help make it as easy as possible for you and remember, practice makes perfect!
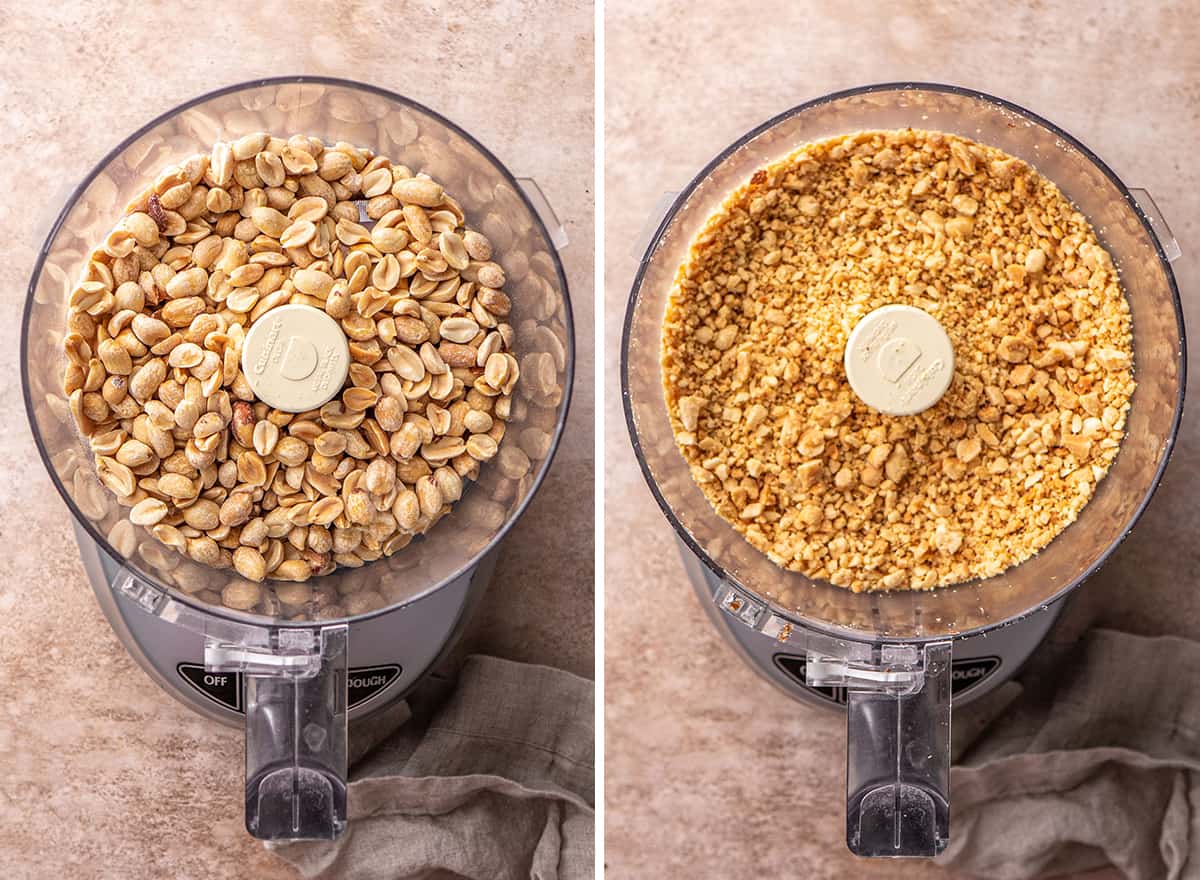
Crush the Peanuts
The first step in this caramel apples recipe is to crush the peanuts (or nut of choice) and put them in a bowl. There are many ways to crush peanuts, here are two I recommend:
- Put the peanuts in food processor or blender and pulse 3 times (or until they are chopped but be careful not to turn them into peanut butter).
- put them in a nut milk bag or plastic bag and crush them with a rolling pin or by hitting them with a large measuring cup (my kids’ favorite way to help).
Make the Caramel
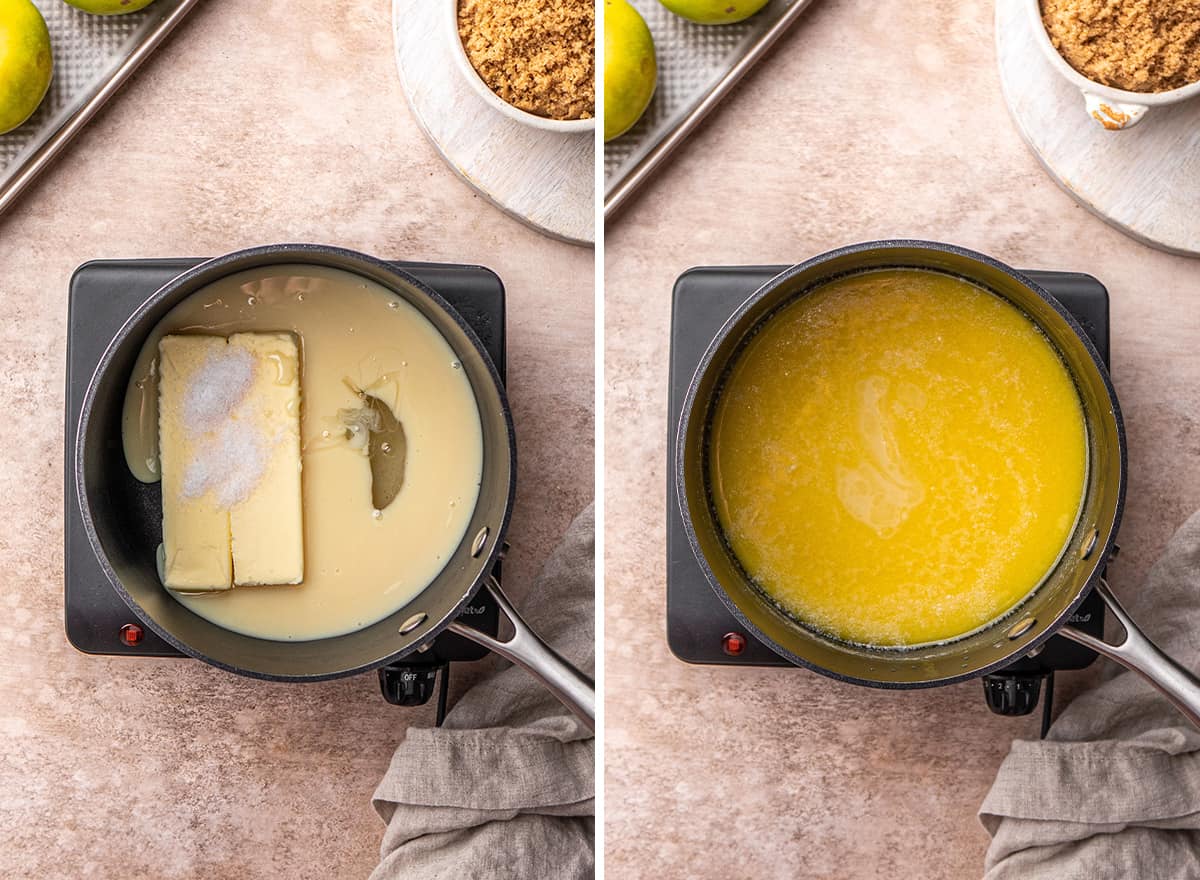
Next, it’s time to make the caramel for dipping. Put butter, corn syrup, condensed milk and sea salt in a heavy-duty, thick-bottomed, tall, saucepan that holds at least 4 quarts. Cook over low heat until the butter is melted.
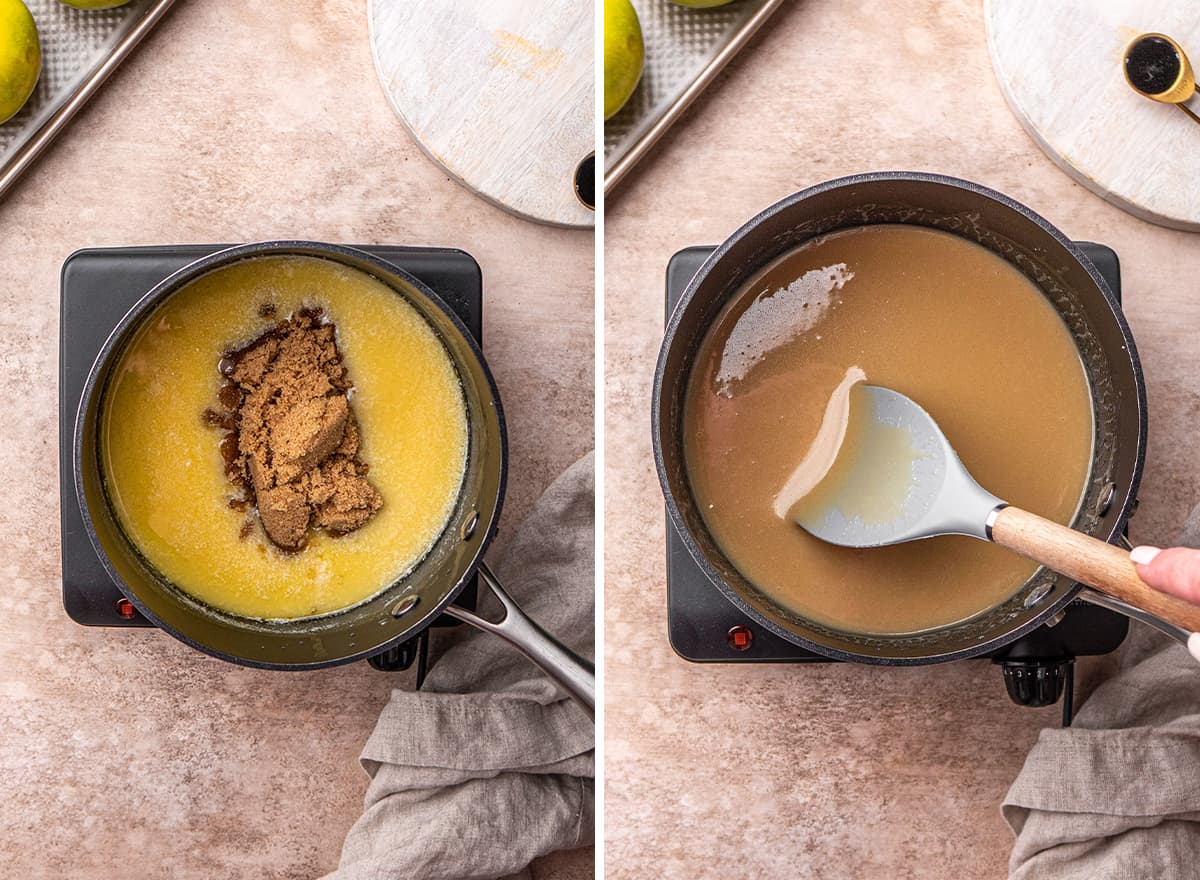
Once the butter is melted, add the brown sugar carefully, making sure not to splash any on the sides of the pan.
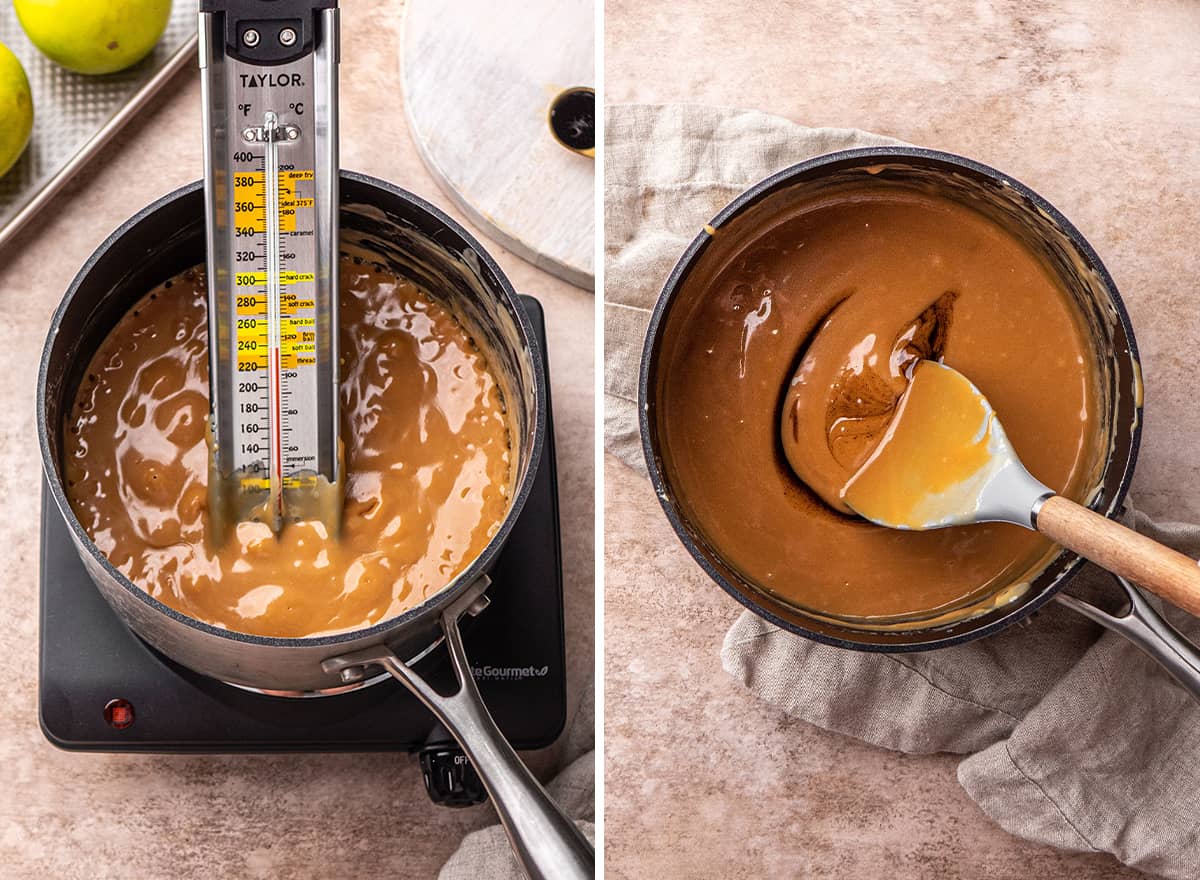
Then, cook over medium-low heat until the caramel reaches 235-240 degrees F on an instant read thermometer, stirring constantly with a heatproof spatula or wooden spoon, making sure not to let any of the mixture on the bottom or sides burn or get too brown. This takes about 20-25 minutes. Do not rush it.
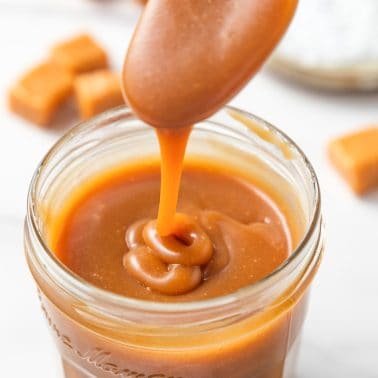
You will know you’re getting close when the caramel becomes slightly darker brown in color (but it’s still light brown), thickens and pulls away from the sides of the saucepan as you stir. It will also remain solid when removed from the pot and left to cool or put in cold water.
When the caramel is finished cooking, remove from heat, add vanilla and stir vigorously.
Dip the Caramel Apples
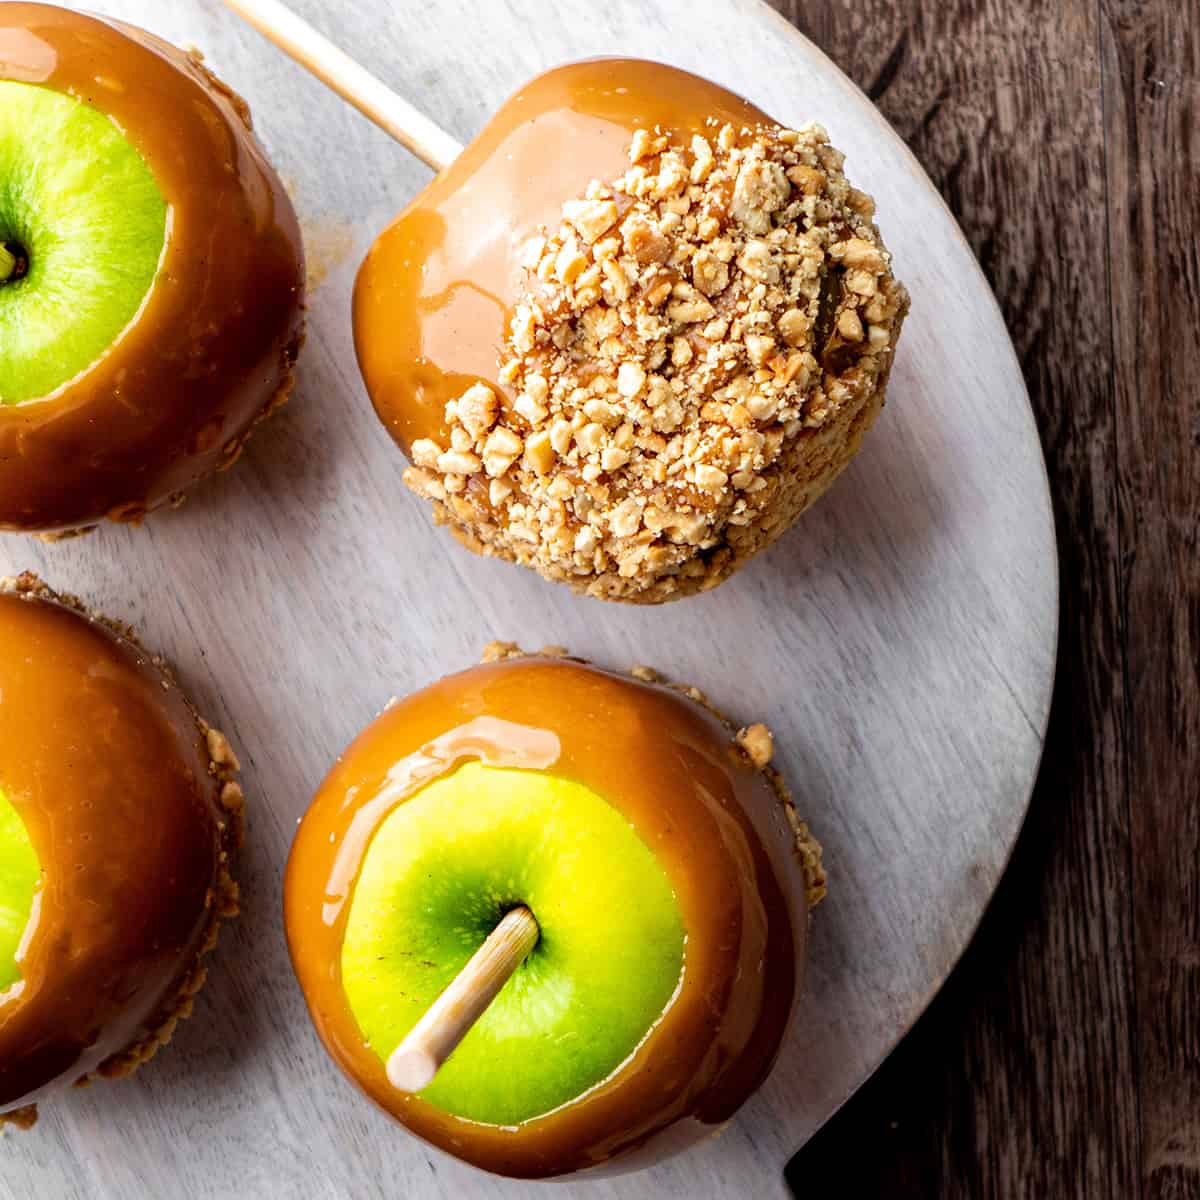
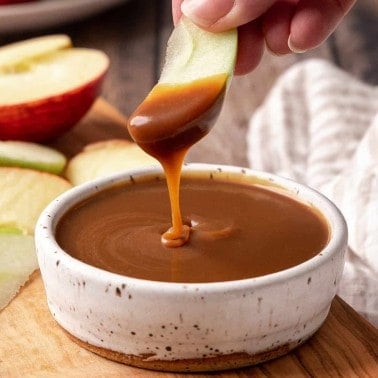
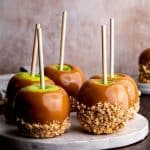
As soon as the caramel is finished cooking, dip the prepared apples into the caramel one at a time, carefully turning them to coat.
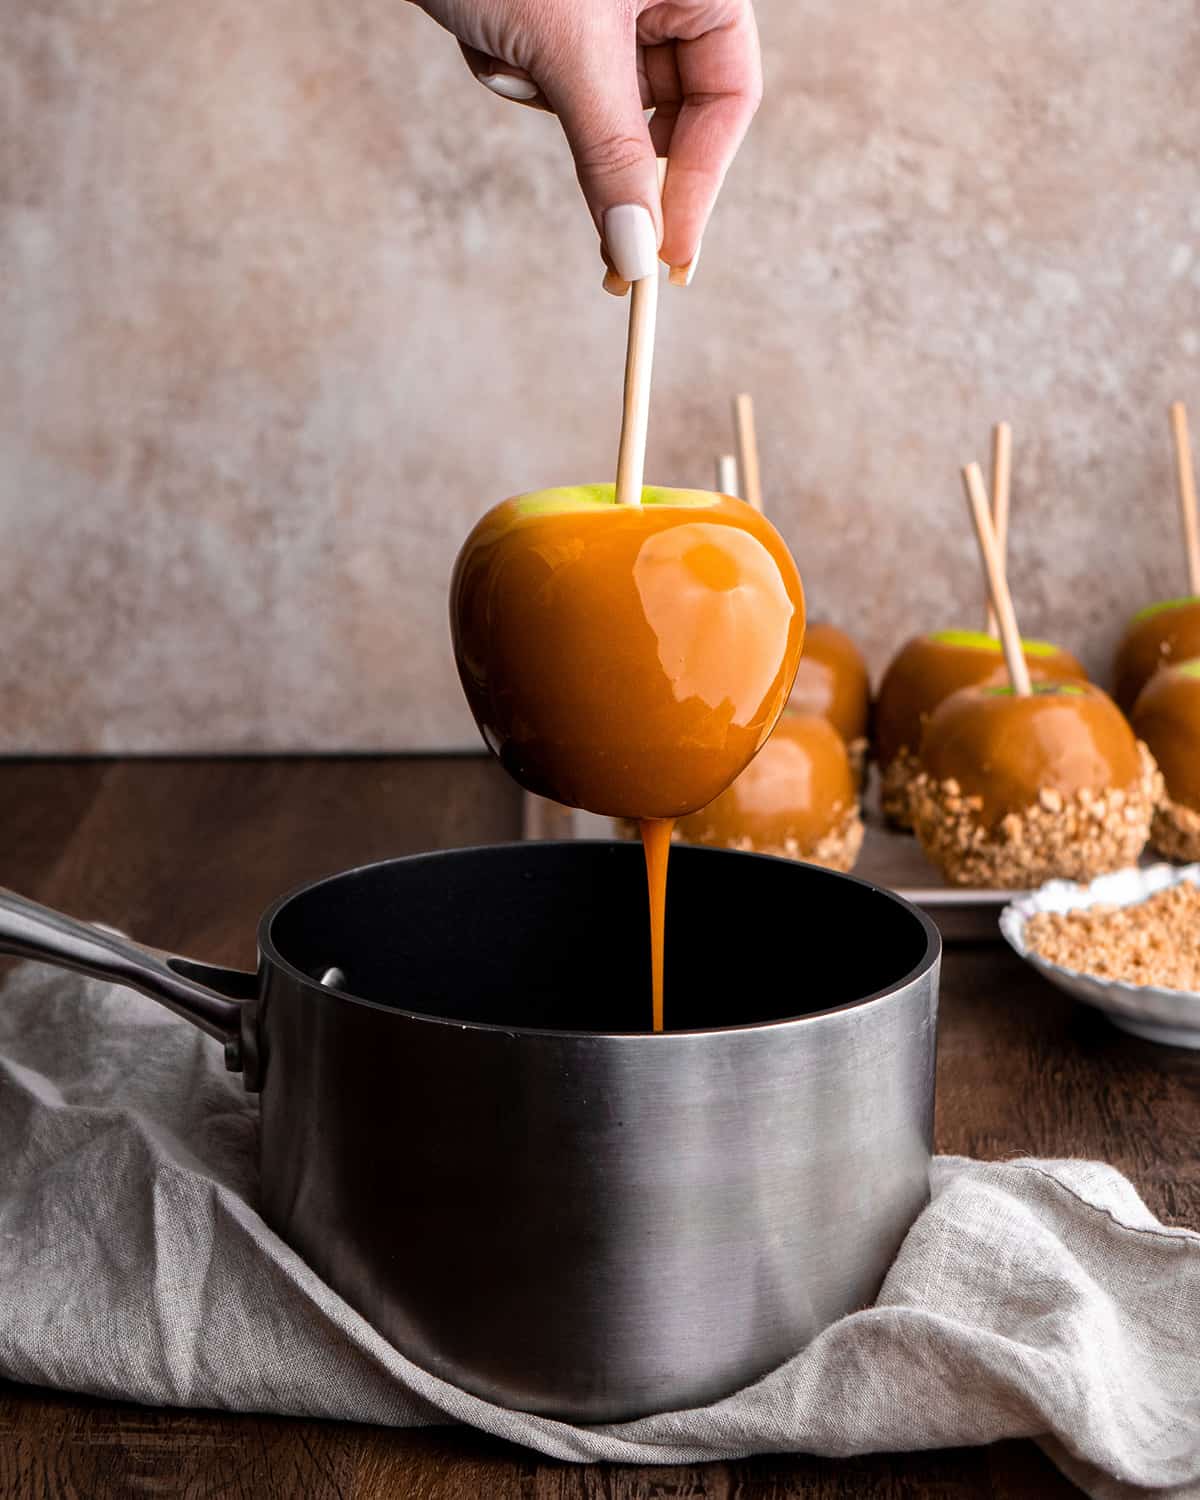
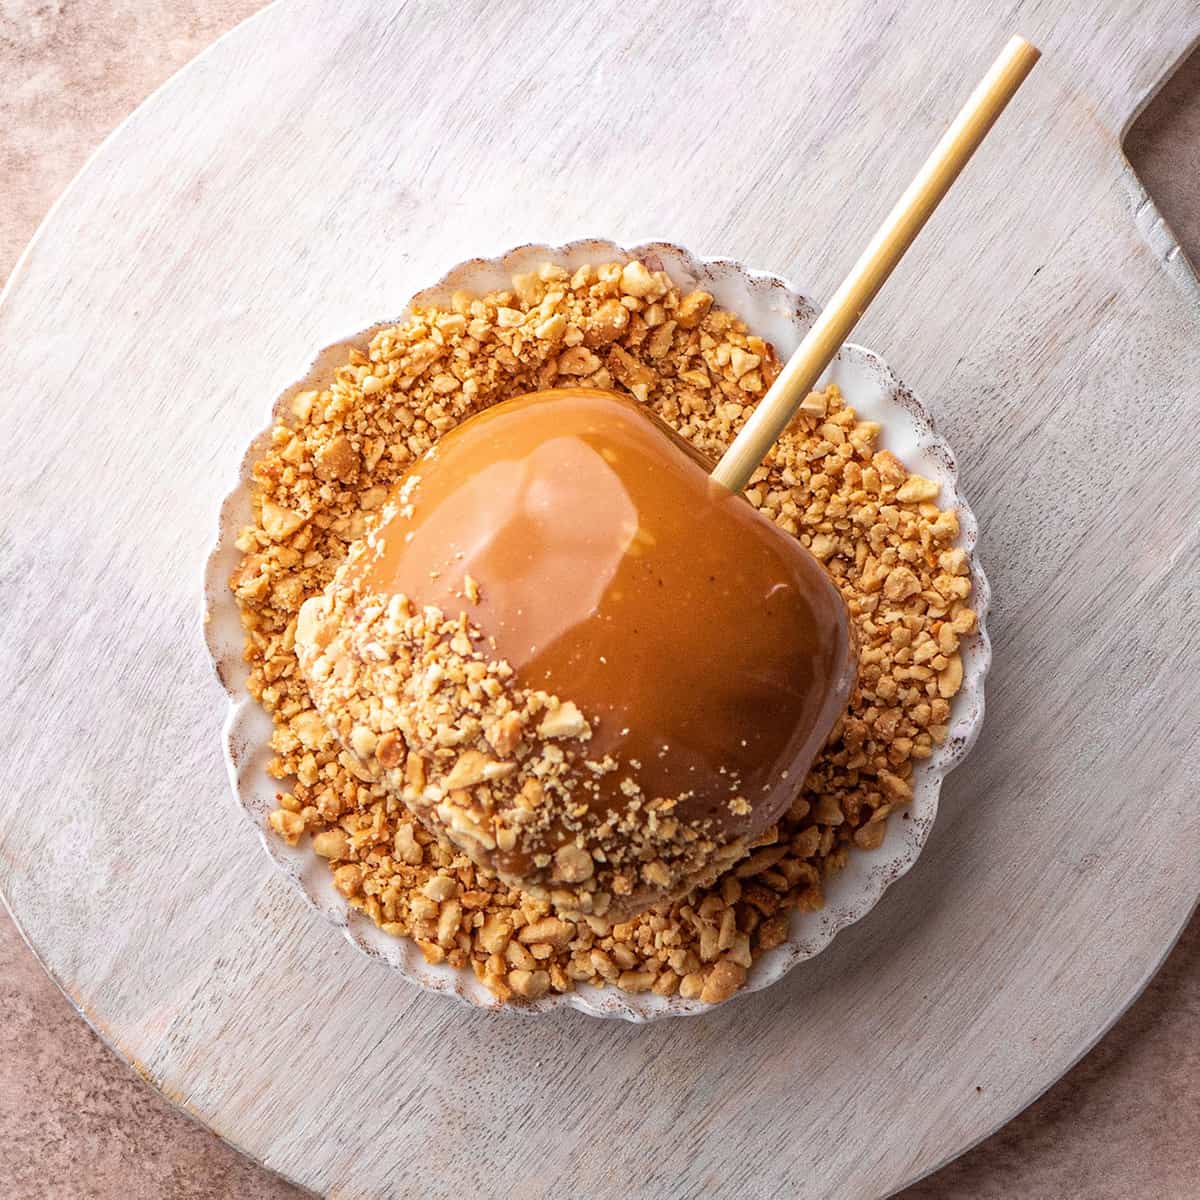
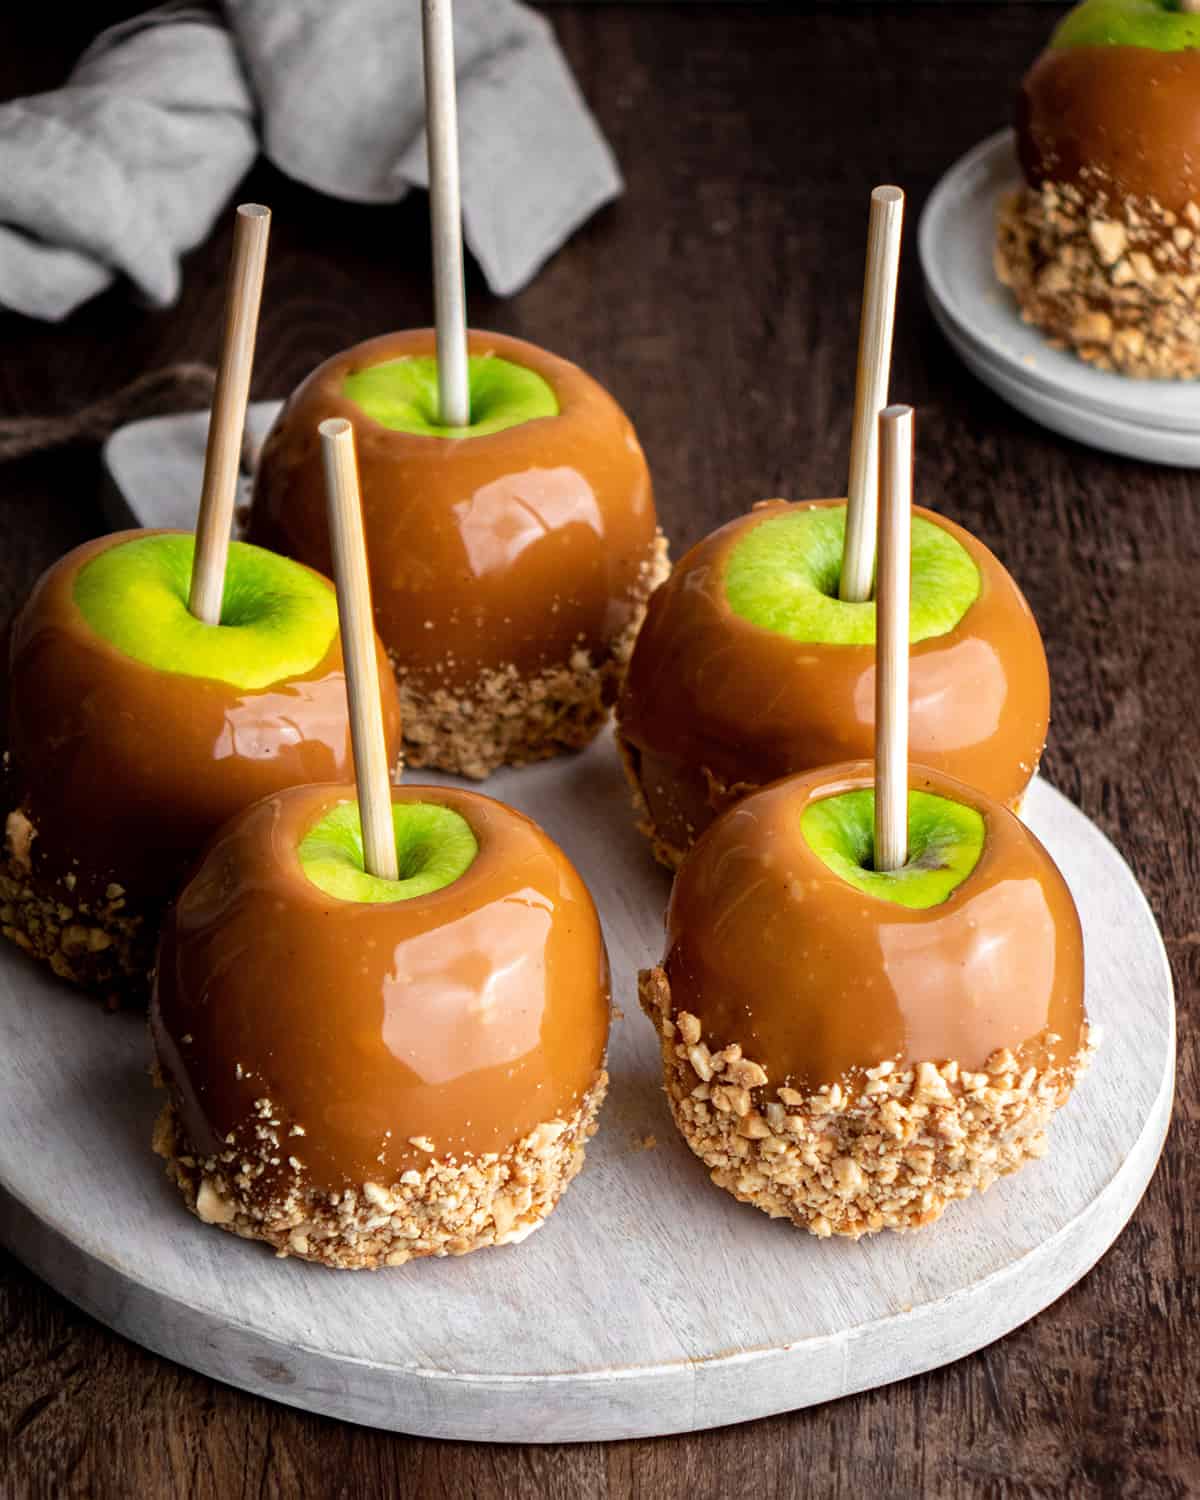
Immediately roll the dipped apples into desired toppings, in this case, crushed peanuts. You can also leave them plain if you’d like.
Set the apples on the prepared baking sheet to harden. To speed up the process put the finished caramel apples in the refrigerator. Remove 30-60 minutes before serving so the caramel is soft.
Caramel Apple Topping Suggestions
Here are some of our favorite foods to roll our caramel apples in:
- Nuts. peanuts, walnuts, pecans, almonds, etc. Just be sure to crush them so they stick well.
- Sprinkles – especially festive fall sprinkles.
- Candy. Mini M&Ms, chopped chocolate bars, etc.
Serve
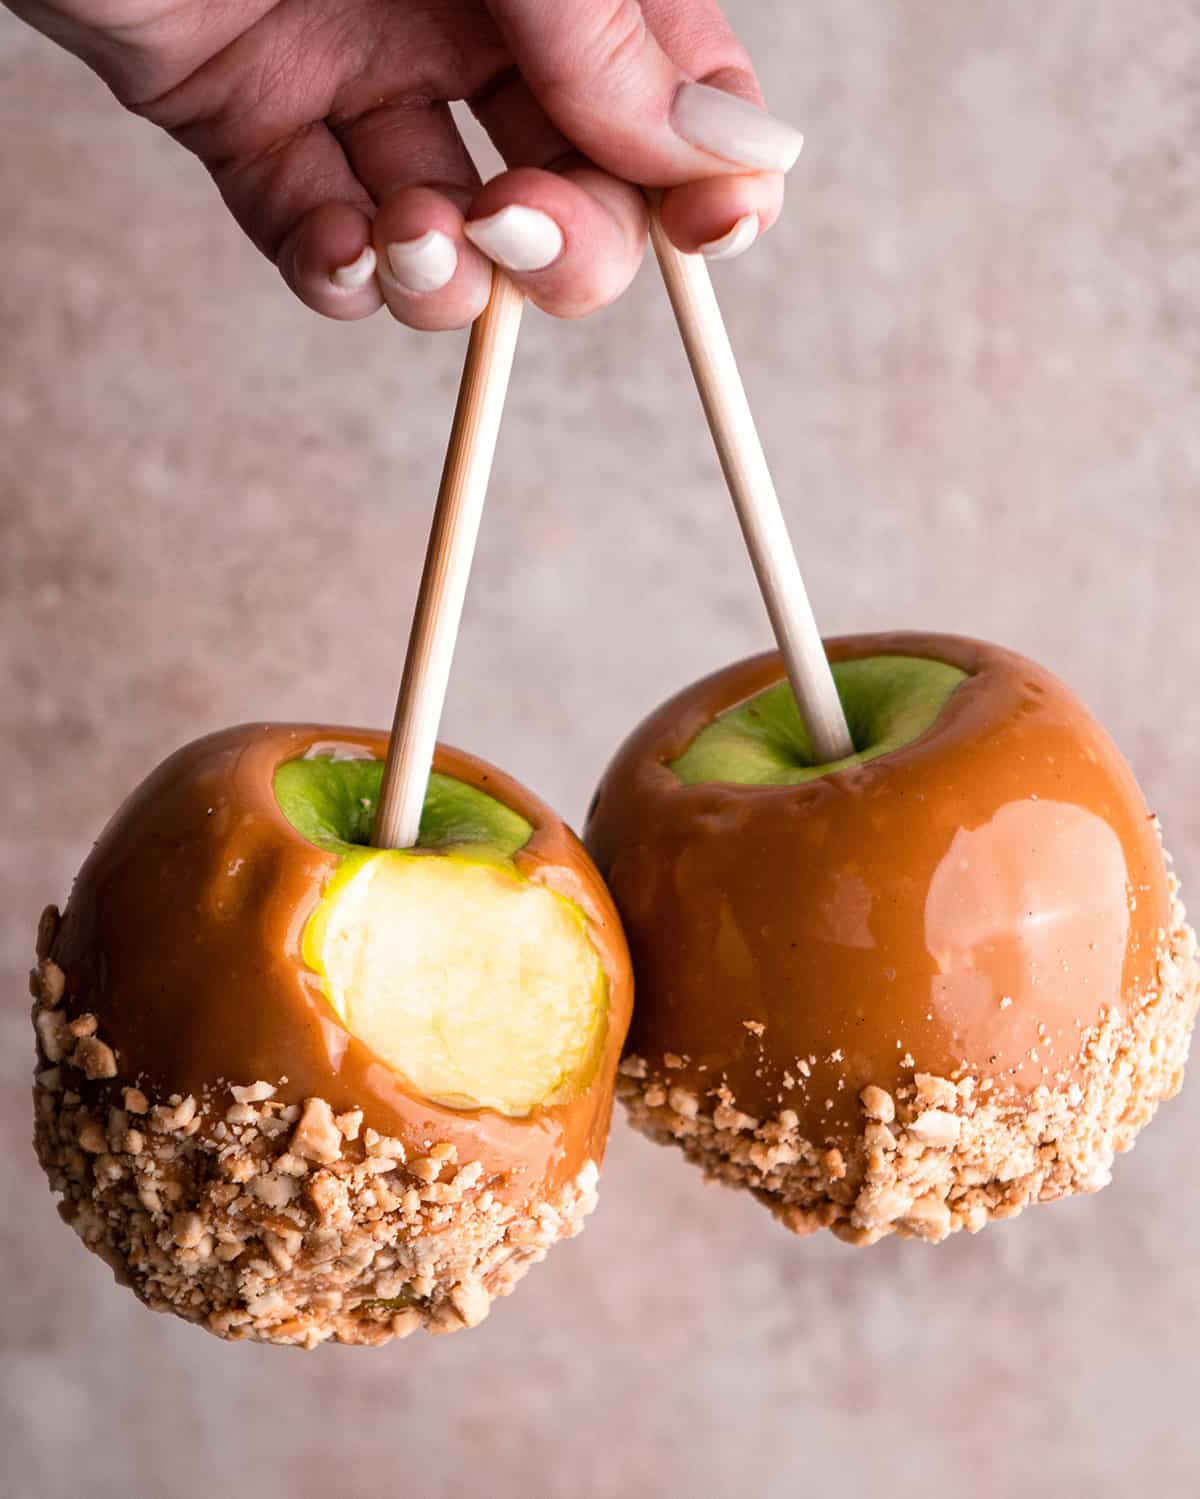
I suggest slicing the caramel apples to serve them because they are much easier to eat that way.
Store
Store these homemade caramel apples in the refrigerator for up to 1 week, whole. Remove 30-60 minutes before serving so the caramel has some time to soften.
Troubleshooting
I’ve run into two problems making homemade caramel, and here is how I’ve dealt with them:
- The butter separates during cooking – if this happens, remove the caramel from the heat and beat it vigorously with a wooden spoon or spatula.
- The caramel has little crystalized bits in it. If this happens you are using a pan that isn’t thick enough on the bottom and causing the sugar to burn and create flecks in the caramel. Use a thick-bottomed, heavy duty pan and this problem will disappear.
- Caramel slides off apples. Use organic apples without a waxy coating. Or thoroughly wash and dry the apples to remove any waxy coating that may be present.
Mistakes to avoid when making caramel
- Using a thin pot – it heats unevenly. Use a tall, heavy-bottomed pot.
- Using a dirty pot – I did this and got flecks in my caramel.
- Not using a candy thermometer.
- Cooking at too high heat If the temperature gets too hot and the caramel becomes too hard as it cools, you can put it back in the pan with a couple of tablespoons of cold water to try and save it.
Caramel Apples Recipe FAQs
You have to wash the apples and remove the wax. Use an organic soap (just be sure to rinse it all off), or a fruit wash to remove the wax. I also use a rough sponge to lightly texturize the skin so it grabs the caramel better. I have found that organic apples (without wax) work the best when making this recipe
Cold apples help the caramel set faster, so I do recommend using chilled apples.
You have to be able to recognize the “soft ball” stage. Place a glass or bowl of cold water next to you as you make the caramel. You will know you reached the soft ball stage when the caramel starts turning darker brown, pulls away from the sides and forms a ball when put in cold water.
We like the tartness of granny smith (green) apples. I also enjoy pink lady apples.
You need to remove the wax as I stated above. Also try buying organic apples that do not have wax on them and using a rough sponge to texturize the skin.
These caramel apples will last for up to 1 week stored in the refrigerator.
Use a fruit wash or organic soap and scrub the wax off of them. Then be sure they are completely dry.
Yes, I suggest storing these caramel apples in the refrigerator for maximum freshness and longevity. Remove them from the refrigerator before serving so the caramel is soft and room temperature when eaten.
Leaving caramel apples out at room temperature overnight is ok, but I suggest storing them in the refrigerator.
If you make and love our recipes, it would mean so much to me if you would leave a comment and rating! And don’t forget to follow along with us on Instagram, Pinterest, Facebook, and Youtube – be sure to tag @joyfoodsunshine and use the hashtag #joyfoodsunshine so we can see your creations!
Homemade Caramel Apples
Equipment
Ingredients
- 10 granny smith apples small, preferably organic without a waxy coating
- 10 wooden sticks
Caramel:
- 1 cup salted butter
- 1 cup light brown sugar
- ¼ cup light corn syrup
- 14 ounces sweetened condensed milk
- ½ tsp sea salt
- 1 teaspoon vanilla extract
Topping
- 2 cups salted peanuts crushed, (or your favorite topping).
Instructions
- Lay out tools
- Line a large baking sheet with a silicone baking mat or greased wax paper, set aside.
- Locate your instant read thermometer and have it close by.
Prepare the Apples
- Wash the apples thoroughly to remove the waxy coating. This step is critical to make sure the caramel sticks to the apples and doesn’t just slide off. I use a clean, rough sponge and warm water to gently rough up the skin and remove the wax. Using organic apples without the wax coating is preferred.
- Dry thoroughly with a towel and set out on the prepared baking sheet.
- Carefully insert the sticks.
- Place the apples on the prepared baking sheet and put them in the refrigerator. Chilling the apples & baking sheet helps prevent the caramel from sliding off the apples.
Crush the Peanuts
- There are many ways to crush peanuts, here are two I recommend: 1) Put the peanuts in food processor or blender and pulse 3 times (or until they are chopped but be careful not to turn them into peanut butter). 2) put them in a nut milk bag or plastic bag and crush with a rolling pin or by hitting them with a large measuring cup (my kids’ favorite way to help).
Make the Caramel
- Combine butter, corn syrup, condensedmilk, brown sugar and sea salt in a heavy-bottomed 4-quartsaucepan.
- Cook over medium-low heat until the caramel reaches 235-240 degrees F on an instant read thermometer, stirring constantly with a heatproof spatula or wooden spoon, making sure not to let any of the mixture on the bottom or sides burn or get too brown. This takes about 20-25 minutes. Do not rush it.
- You will know you’re getting close when the caramel becomes slightly darker brown in color (but it’s still light brown), thickens and pulls away from the sides of the saucepan as you stir. It will also remain solid when removed from the pot and left to cool or put in cold water.
- When the caramel is finished cooking, remove from heat, add vanilla and stir vigorously.
Assemble
- Dip apples into the caramel one at a time, carefully turning them to coat.
- Immediately roll the dipped apples into desired toppings, in this case, crushed peanuts. You can also leave them plain if you’d like.
- Set onto the prepared baking sheet to harden. To speed up the process put the finished caramel apples in the refrigerator. Remove 30-60 minutes before serving so the caramel is soft.
Video
Notes
- Apples. You can choose any apple variety to make these homemade caramel apples. I prefer granny smith or pink lady apples for their tart flavor. I suggest buying organic apples that do not have a waxy coating because the caramel sticks to them better. (more on this later).
- Peanuts. I love salted peanuts, you can use any nut (almonds, cashews, pecans, etc.) Other suggestions include:
- Sprinkles – especially festive fall sprinkles.
- Candy. Mini M&Ms, chopped chocolate bars, etc.
- Salted butter. I always use salted butter (plus additional sea salt) when making caramel because it helps stabilize the candy mixture so the butter doesn’t separate. I don’t recommend making substitutions.
- Light brown sugar. Dark brown sugar can be used in place of light for a caramel with a more pronounced molasses taste.
- The butter separates during cooking – if this happens, remove the caramel from the heat and beat it vigorously with a wooden spoon or spatula.
- The caramel has little crystalized bits in it. If this happens you are using a pan that isn’t thick enough on the bottom and causing the sugar to burn and create flecks in the caramel. Use a thick-bottomed, heavy duty pan and this problem will disappear.
- Caramel slides off apples. Use organic apples without a waxy coating. Or thoroughly wash and dry the apples to remove any waxy coating that may be present.
- Using a thin pot – it heats unevenly. Use a tall, heavy-bottomed pot.
- Using a dirty pot – I did this and got flecks in my caramel.
- Not using a candy thermometer.
- Cooking at too high heat If the temperature gets too hot and the caramel becomes too hard as it cools, you can put it back in the pan with a couple of tablespoons of cold water to try and save it.
Nutrition
Nutrition information is automatically calculated, so should only be used as an approximation.

My caramel turned out beautiful. It was perfect per the recipe. My husband really liked it. It was time consuming to make, as all caramel recipes are. My arms got tired stiring it. LOL. But in the end, it was worth the effort. Good recipe.
If I had one thing to say on the down side, I thought the taste of the sweetened condensed milk was too much. Although I like it and use it frequently in many recipes, it was too strong in this one. Just my opinion. My husband disagrees. LOL
Hello,
I want to make color candy apples for Christmas like and yellow and green, what do you suggest I do instead of buy them overpriced candy mix