Healthy Peanut Butter Rice Crispy Treats
Updated Jul 12, 2025
This post may contain affiliate links. Please read our disclosure policy.
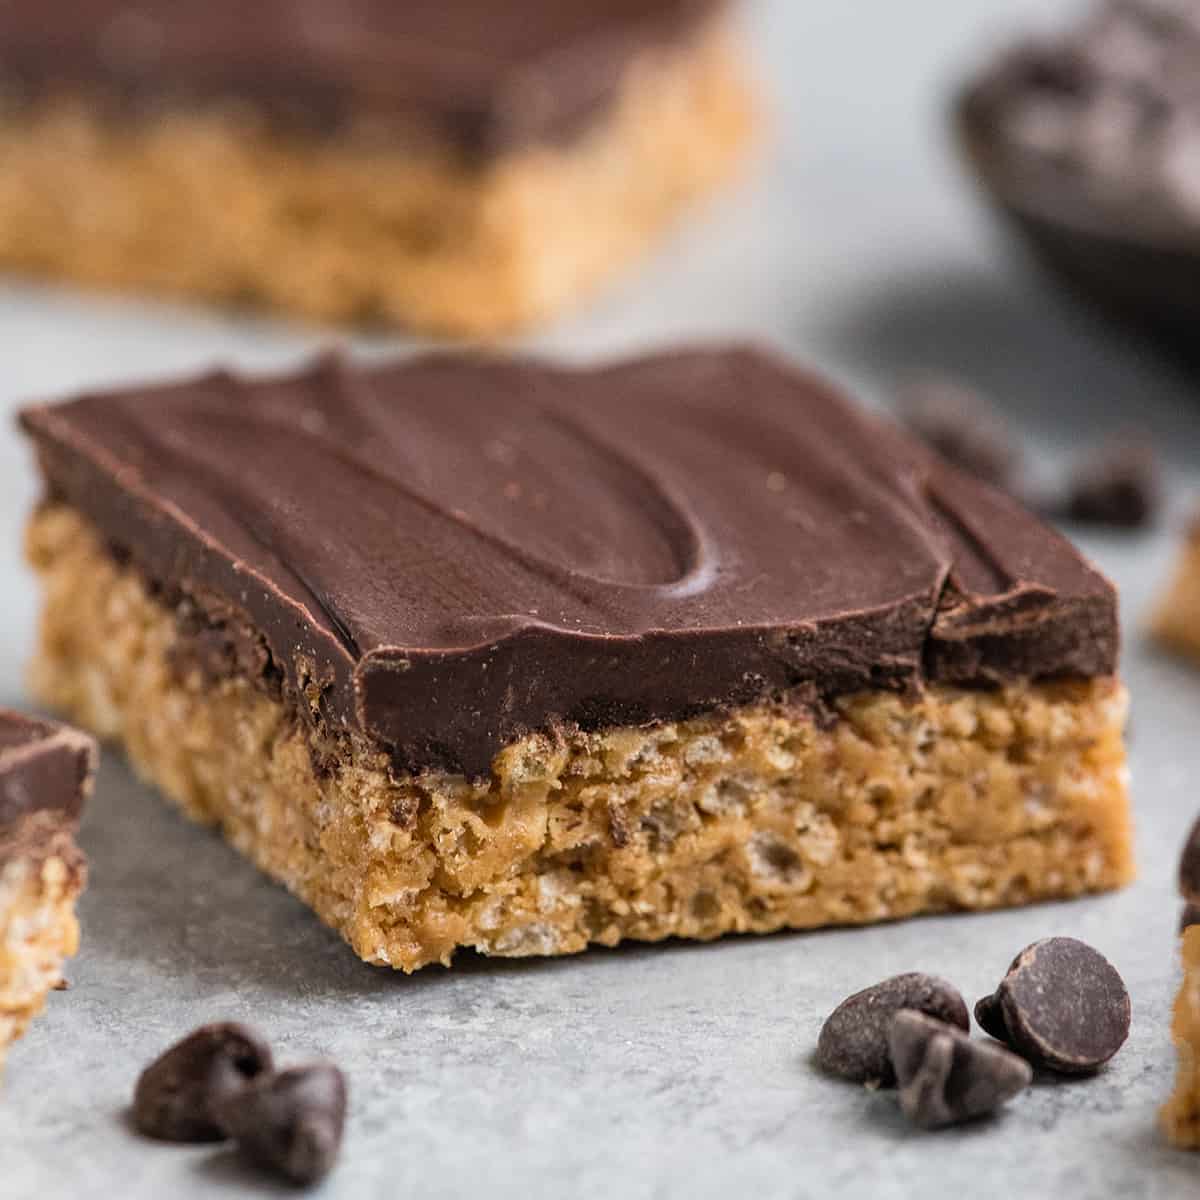
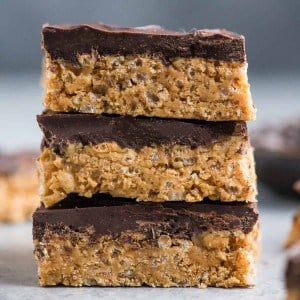
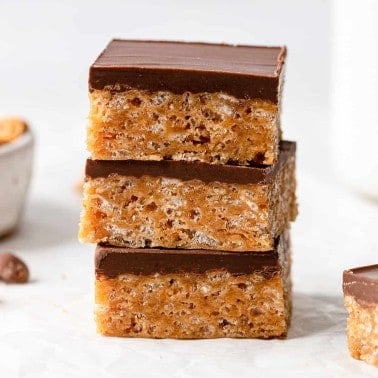
These healthy peanut butter rice crispy treats are made with 6 good-for-you ingredients in 10 minutes! There are no marshmallows or corn syrup in this recipe. They are the perfect easy, no-bake, gluten & dairy-free dessert to satisfy your chocolate peanut butter cravings!

These healthy peanut butter rice crispy treats are an easy, no-bake dessert perfect for chocolate peanut butter lovers. They are made with only 6 healthy ingredients and require mere minutes of hands-on prep time (also try my classic peanut butter rice crispy treats).
This recipe doesn’t use marshmallows or corn syrup, and they’re gluten, dairy and refined sugar free!
Readers absolutely love these healthy peanut butter rice crispy treats, see what Bianca says:
Tastes absolutely amazing for being healthy! It’s so easy to make and kid friendly as well. This will definitely be a staple treat In our house! 🙂
– Bianca
Healthy Peanut Butter Rice Crispy Treats: Ingredients & Substitutions
- Peanut Butter. Any nut or seed butter can be used in this recipe: almond butter, cashew butter, sunflower seed butter, etc.
- Honey. Use maple syrup or brown rice syrup for a vegan version.
- Crispy brown rice cereal. I used and Organic Brown Rice Crispy Cereal but any crispy rice cereal would work great in this recipe, including classic Rice Krispes.
- Bittersweet Chocolate. Choose your favorite variety of chocolate that complies with your dietary needs! For a dairy-free & vegan options choose SunSpire or Enjoy Life Foods products!

How to Make Healthy Peanut Butter Rice Crispy Treats
Let’s walk through how to make this recipe, and don’t forget to watch the video. To ensure easy removal, line your baking pan with parchment and lightly grease it.
Begin by gathering and measuring out the ingredients. The process moves fast so you want to be prepared.
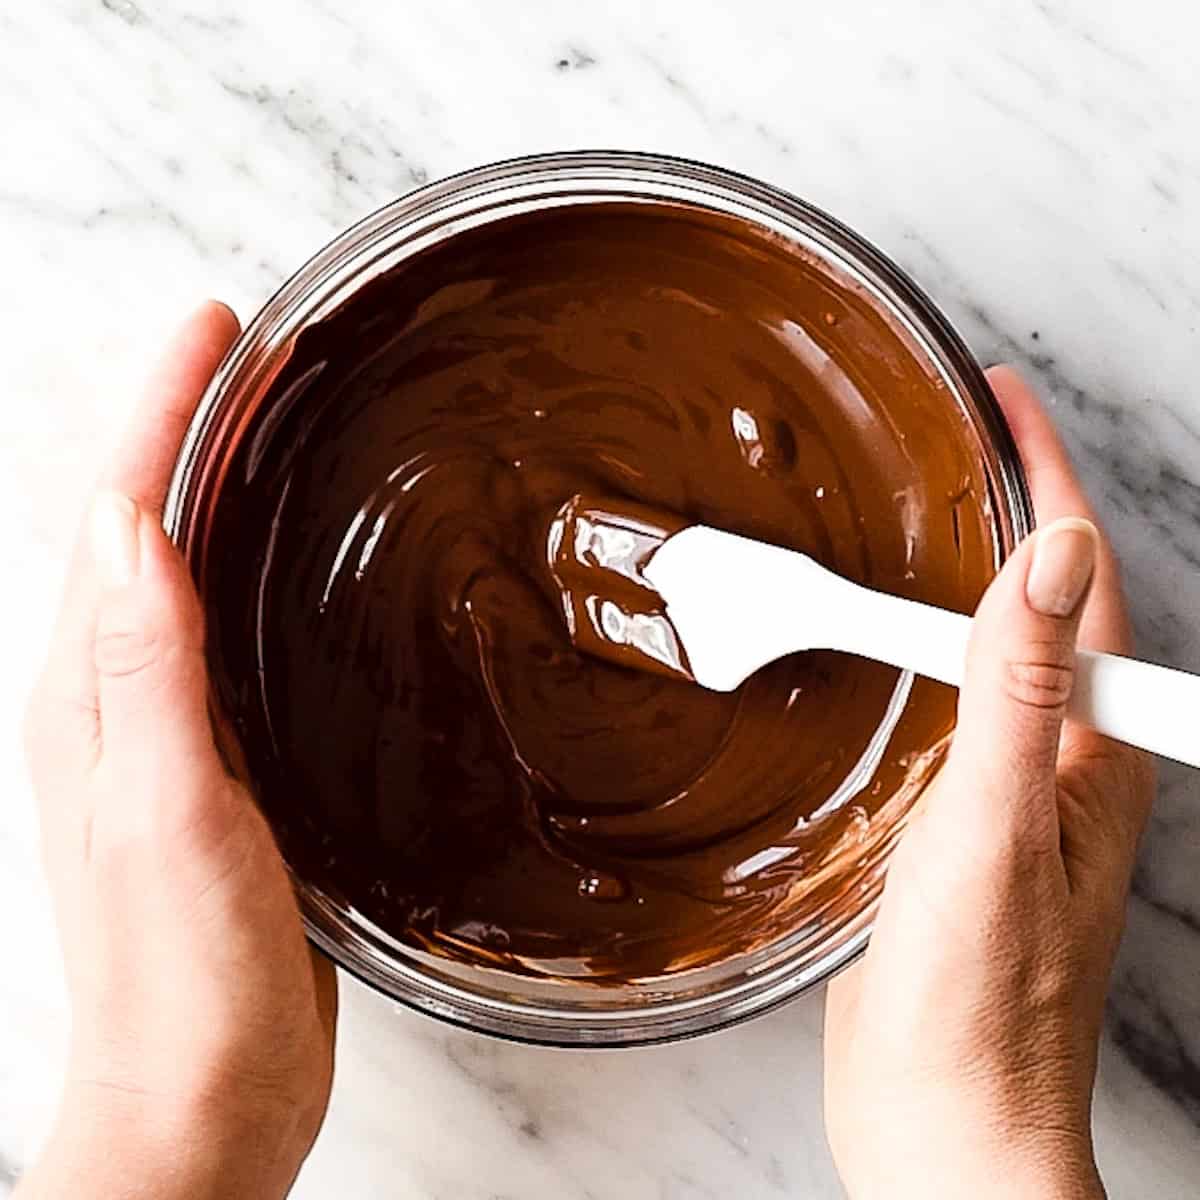
Make the chocolate peanut butter topping by melting the ingredients in the microwave or on the stovetop and stirring until smooth and glossy. Set aside to cool slightly.

Next, melt the peanut butter and honey together until smooth. You can use the microwave or stovetop, just be careful not to overheat the mixture.
Then, add the peanut butter/honey mixture to the crispy rice cereal and stir to combine.

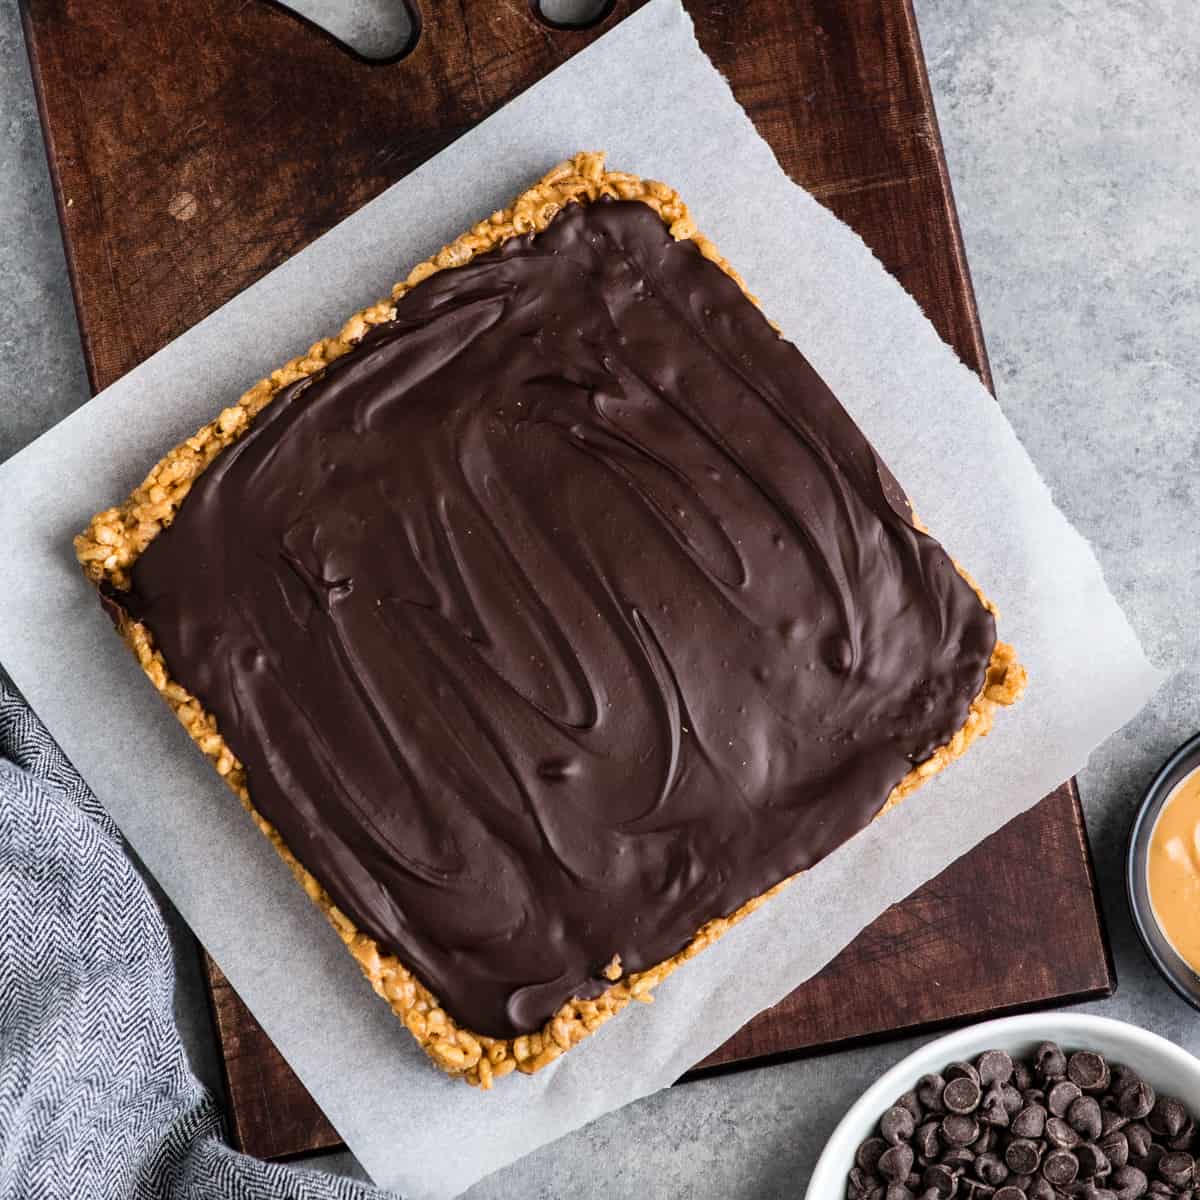
Next, use a greased spatula to spread the peanut butter crispy mixture into the pan and spread it out evenly.

Then, pour the chocolate peanut butter topping onto the healthy peanut butter rice crispy base and evenly spread it over the top of the bars.
Let the topping set at room temperature, or you can put them in the refrigerator to speed up the process.
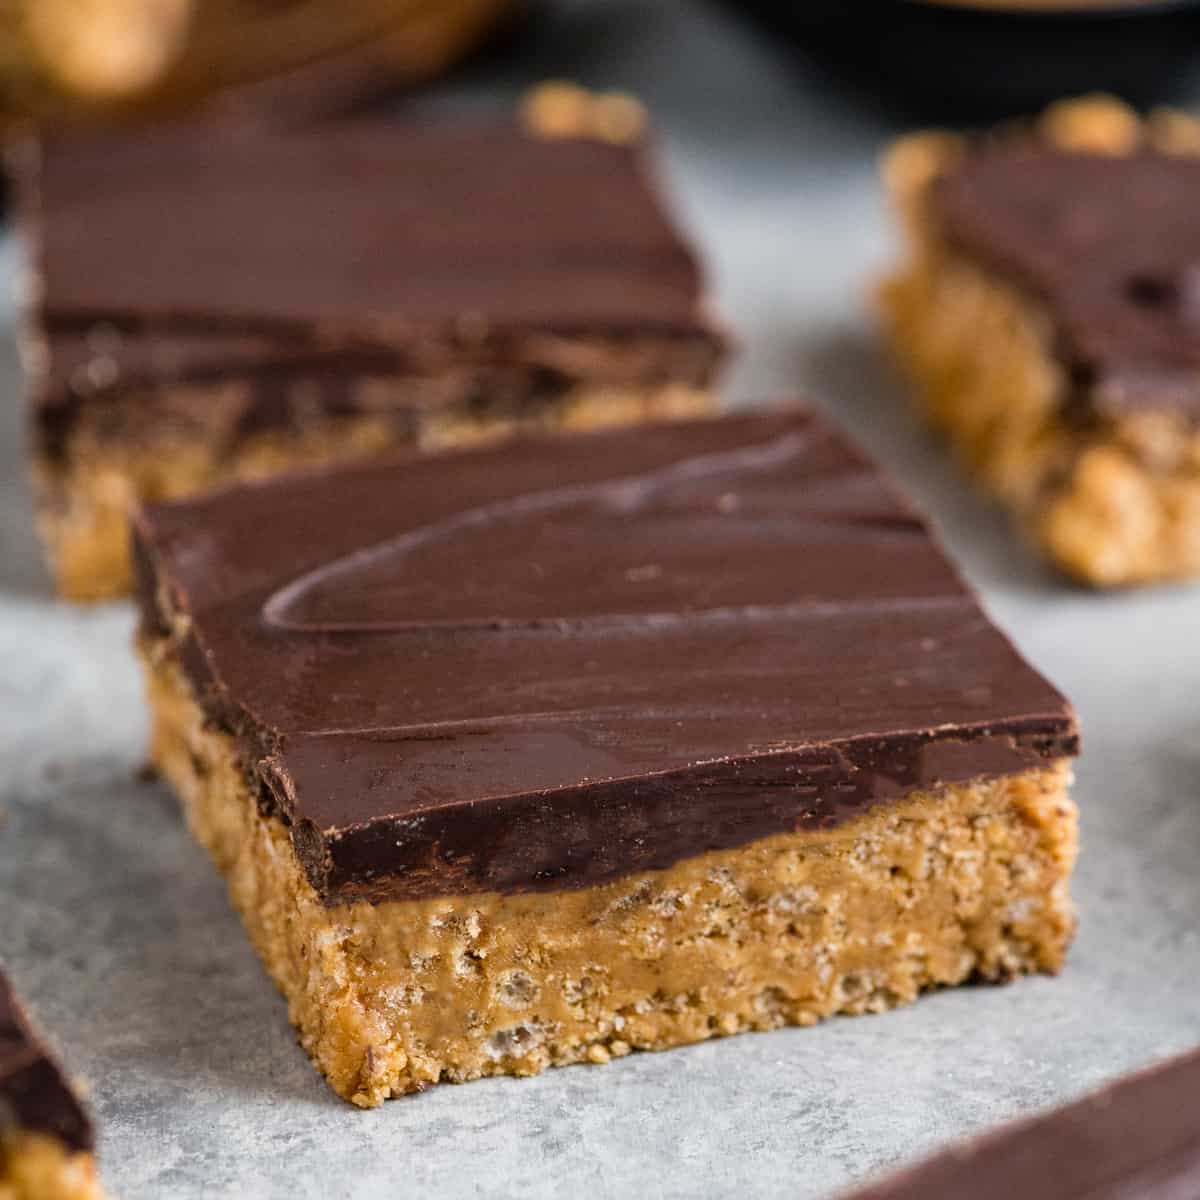
One the top is set, if you put them in the fridge, take them out to warm slightly before cutting. If you try cutting them when the chocolate topping is really cold, it will crack.

Cut & Serve
Serve the healthy peanut butter rice crispy treats at room temperature. Store any leftovers in an airtight container at room temperature or in the refrigerator.
Store/Freeze
Store leftovers in an airtight container at room temperature for 3 days, in the fridge for 1 week or in the freezer for up to 1 month. To prevent drying out you may want to wrap them individually in plastic wrap.
Healthy Peanut Butter Recipe FAQs
Yes! Double the ingredients and make them in a 9×13″ baking dish.
Add more peanut butter and honey 1 Tablespoon at a time until it reaches your desired consistency – but this should not happen if you follow the recipe.
If you make and love my recipes, it would mean so much to me if you would leave a comment and rating! And don’t forget to follow along on Instagram, Pinterest, Facebook, TikTok and Youtube – be sure to tag @joyfoodsunshine and use the hashtag #joyfoodsunshine so I can see your creations!
Healthy Peanut Butter Rice Crispy Treats
Video
Ingredients
Peanut Butter Rice Crispy Treats
- ¾ cup creamy peanut butter
- ⅓ cup honey
- ¼ teaspoon sea salt
- ½ teaspoon pure vanilla extract
- 3 cups crispy brown rice cereal
Chocolate Peanut Butter Topping
- 1 cup semisweet chocolate (4 ounces)
- 1 Tablespoon creamy peanut butter
Instructions
Make the Peanut Butter Rice Crispies
- Line an 8×8” or 9×9” square baking pan with parchment paper. Lightly grease and set aside.
- In a large, microwave-safe bowl or on the stovetop over medium-low heat, melt together the honey and peanut butter, stirring until combined. (be very careful to not overheat).
- Remove from heat and stir in the sea salt and vanilla extract until combined.
- Add the crispy rice cereal to a large clean & dry mixing bowl.
- Pour peanut butter mixture on top of the cereal and stir until completely combined.
- Pour mixture into the prepared baking pan. Use a greased spatula to spread it until the top is even and smooth.
Make the Topping
- Melt the chocolate and peanut butter together in a small microwave-safe dish or on the stovetop over medium-low heat. Stirring until just combined.
Assemble & Serve
- Pour the topping over the peanut butter rice crispy treat base, using a spatula to spread it evenly and smoothly.
- Place treats in the refrigerator for 60 minutes (or in the freezer for a shorter chill time).
- Remove 5-10 minutes before serving to let them warm up slightly before cutting or the chocolate will crack. Serve at room temperature!
- Store in an airtight container in the refrigerator.
Notes
Ingredient Substitutions
- Peanut Butter. Any nut or seed butter can be used in this recipe: almond butter, cashew butter, sunflower seed butter, etc.
- Honey. Use maple syrup or brown rice syrup for a vegan version.
- Crispy brown rice cereal. I used and Organic Brown Rice Crispy Cereal but any crispy rice cereal would work great in this recipe, including classic Rice crispies.
- Semisweet Chocolate. Choose your favorite variety of chocolate that complies with your dietary needs!
Store/Freeze
Store leftovers in an airtight container at room temperature for 3 days, in the fridge for 1 week or in the freezer for up to 1 month. To prevent drying out you may want to wrap them individually in plastic wrap.Nutrition
Nutrition information is automatically calculated, so should only be used as an approximation.

Would I be able to substitute Agave Nectar for Honey? Similar consistency without the possibility of crystallizing.
Thanks
Yes!
We love these treats. I can’t seem to get them to not crumble all over instead of staying in one piece, any suggestions? I have made them several times
Maybe pat them down firmer before toppng with the chocolate? I put parchment paper on top of the krispie mixture and use my palms to pat it down really good.
I made these for a 4th of July party, and they were a HUGE hit. I made them again for co-workers and they loved them!! This recipe is so easy and delicious. There’s no better combo than chocolate and peanut butter!
Hi, I’m just making these but confused about the amount of chocolate specified – 1 4 oz cup??
Hey Debbie! I fixed that in the recipe card (it was confusing)! It is 1 cup of chocolate, which equals 4oz!
Do you think these would freeze well once cut into squares?
Hey Dani! I actually don’t think these would freeze very well! I’d recommend only making half the recipe if you think you wouldn’t be able to finish an entire batch!
Oh my goodness – these sound SO YUM with the peanut butter. Reminds me of a scotcharoo which is one of our favorite treats to make!
Oh my goodness – these sound SO YUM with the peanut. Reminds me of a scotcharoo which is one of my favorite desserts.
I made these last night and they were a huge hit with everyone at work. Great recipe and so easy to make and the recipe doubles with no issues.
I will try this recipe tomorrow for my family.
I’m perplexed. It says it yields 16 squares, you’re making this in a 8×8 or 9×9 and they are 146 cal per serving…. so you’ve got 16 tiny 1/2 inch (at best) pieces, what do they consider a serving?? I’m but I’d cut these into maybe 9 squares probably only 6 squares to make realistic servings, can someone help me out? Is this a typo or what??
Hey Michelle! The nutrition information is calculated for 1/16 of the recipe, whether you make it in an 8×8″ or 9×9″ pan. I find the small squares to be perfect, but if you would like a larger serving size by all means go for it! LOL! I recommend using this recipe nutrition calculator and entering in the serving size of your choice to get the calorie count that works for you!