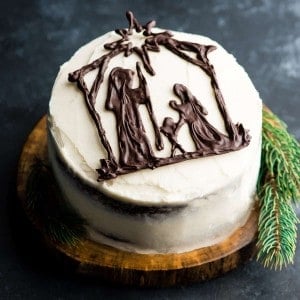
Nativity Cake (Birthday Cake for Jesus)!
Updated Dec 04, 2023
This post may contain affiliate links. Please read our disclosure policy.
Check out this step-by-step tutorial & video showing how to make this Christmas Nativity Cake Topper. It’s a simple and beautiful birthday cake for Jesus! Plus, I’ve included some ways our family celebrates a Christ-centered Christmas!

Happy December Everyone! This is our favorite month of the entire year! We adore the Christmas season and the significance it has to our faith and our family.
So I wanted to take some time to share a fun and easy way to make a Birthday Cake for Jesus, which is a tradition we have been doing with our kids since our oldest’s first Christmas!
I don’t know about you, but after a month of decorating and baking cookies, candies, etc. making a elaborate cake isn’t something I get too excited about. So a couple years ago I thought of this idea, to create a Nativity cake that shows the meaning of Christmas in an a beautiful but simple way.
I had so many comments on it last year that I wanted to show you all how I do it, step-by-step! I also want to share some of our family traditions that help us keep our holiday season Christ-centered and full of joyful anticipation!

How to Make a Birthday Cake for Jesus
Let’s get started with chatting about what you’ll need to make this Nativity cake. I have included a list of ingredients and equipment in the recipe card below, but I thought it would be helpful to walk through all of it step-by-step!
We’ll start with the ingredients and then move on to the equipment/tools needed to make this nativity cake!
Nativity Cake Ingredients:
- Semi-sweet Chocolate. The Nativity Cake Topper is made out of 1 ingredient, melted chocolate. You can use your favorite chocolate variety. I usually use dark chocolate chips, but any variety works well (including chocolate melting discs of any flavor or color).
- Vanilla Frosting. I highly recommend using my recipe for homemade vanilla frosting or vanilla buttercream frosting. They are the best ever. I recommend making the entire batch (even if you are only making a 6″ round cake), because any extra can be frozen or used to decorate sugar cookies! 😉 You can use store bought frosting, just make sure to purchase enough to frost an entire cake (6-8 cups)
- Frozen Cake (6″ or 9″ round). Whenever I make a birthday cake for anyone (Jesus included) I always use this homemade chocolate cake recipe from scratch. I worked hard to create it (took me over 2 years to get it just right)!
Baking a 6″ or 9″ Round Cake
NOTE: our chocolate cake recipe makes a two-layer 6″ round cake. You can double it to make a double-layer 9″ round cake.
I always opt to make my cakes in deep cake pans (deep 6″ x 3″ cake pan and deep 9″ x 3″ cake pan). Then, after baking I use a very sharp bread knife and cut them into two layers (by slicing them width-wise through the center). I think cakes turn out more moist if baked this way.
Since my oldest’s birthday is 3 weeks after Christmas, I let her choose the flavor of Jesus’s Birthday Cake. I bake two 6″ round cakes, cut them in half and freeze them both. Then we use one for Jesus and one for Bethany. The 6″ size is perfect for our family right now (especially with all the other sweets present around the holidays)!
Bake ahead! I usually bake the cake we’ll be using for Jesus’s Birthday Cake weeks ahead of time! I pick a day we don’t have a lot going on and bake it so it can be frozen and ready to go on Christmas Eve!

Equipment for making this Birthday Cake for Jesus:
Here’s a list of the tools I use to make this birthday cake for Jesus. Feel free to use your favorite cake decorating tools!
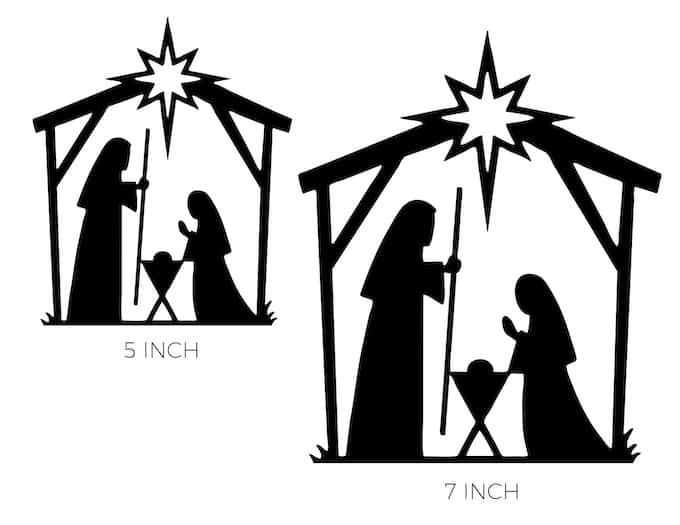
- Nativity Printable. Print this Nativity Scene Cake Topper Tracing Page and select which size you would like to use!
- Waxed Paper. Using waxed paper is key to ensuring easy removal of the nativity scene!
- Tape. I recommend using masking tape to tape the waxed paper onto your flat surface. I have found that masking tape stays put a little better when it’s cold than scotch tape or duct tape! But as long as you can get it to stick without moving you’re good to go!
- Flat Surface. You will attach the printable and waxed paper to this surface, then transfer the chocolate nativity scene on this surface to the freezer. It’s important that it is flat (no edges), thin and lightweight for easy transportation! I recommend a cutting board or flat cookie sheet (I have used both).
- Decorating Bag. Both disposable decorating bags and reusable decorating bags work perfectly! I recommend a 12″ decorator bag!
- Wilton Round Tip #7. I have tried many different size decorating dips, and the Wilton #7 is my favorite. It’s not too small, but small enough to trace the little details without making a chocolatey mess!
- Tip Couplers. These are necessary to attach the tip to the decorating bag!
- Frosting Spatula. I use this frosting spatula every time I frost a cake! Such a great tool!
- Pastry Scraper. This pastry scraper is the key to flat sides, tops and edges when frosting a cake! I love it!
Click here to download and print the traceable Nativity Scene!
How to make the Nativity Cake Topper
Once you have assembled all the ingredients and equipment for making this Nativity Cake. Start with making the Nativity Scene Cake Topper because it needs to harden in the freezer before it can be placed on top of the cake.
Prepare the Nativity Scene Printable to be traced
To do this I recommend having the Nativity Scene Printable all ready to go before melting the chocolate.
- First, choose the size topper you’d like to make and cut it out (as pictured below).
- Place it on top of a flat surface (in this video and these photos I used a flat wooden cutting board).
- Cover the printable with waxed paper and tape it down to the flat surface. This will ensure the waxed paper doesn’t move while you are tracing the printable with chocolate.
Once you have that prepared, it’s time to move on to the next step.

Prepare the decorating bag
Next, place the coupler into the decorating bag and attach the tip. It’s important to have the bag prepared so the chocolate doesn’t cool too much.
Melt the chocolate.
Once everything is prepared and ready to go, it’s time to melt the chocolate. This can be done in the microwave, on a stovetop over low heat, or in a double boiler.
Be sure not to over-melt the chocolate. If it is too warm it will be too thin to pipe/trace with, and you will need to wait until it cools.

Fill the Piping Bag.
Here’s a fun little trick for you to make filling a piping bag easier (see the photo below)! Choose a tall, skinny cup and place the piping bag inside! Then fold the edges over the cup and make sure the top is wide open!
This makes it super easy to fill the bag with just about anything! Using a cup also catches any chocolate that might leak out of the bottom as you’re filling the bag!
Once the bag is full, pull the sides of the bag up and twist the top closed. Then you’re ready to start tracing!

Trace the Nativity Scene!
Carefully work your way around the nativity scene, gently squeezing the chocolate as you trace over the black lines on the Nativity Printable.
This is when you can be artistic and add your own flair. Make it as thick or thin as you’d like, just remember that you need to make it thick enough to withstand being frozen and removed from the waxed paper!
Sometimes I add some stars around the outside of the scene. Or I write “happy birthday Jesus” in chocolate somewhere on the top so that can also be frozen and added to the cake!

Freeze the Nativity Cake Topper
Once you have finished tracing the design, place your entire setup (except for the piping bag) into the freezer to harden. It will take about 30 minutes to be completely ready to go!
While the nativity topper is setting, it’s time to frost the birthday cake for Jesus!

Frost the Birthday Cake for Jesus
While the nativity cake topper is hardening, frost the cake! Remove the frozen cake layers from the freezer and use frosting to secure the bottom layer onto the cake plate of your choice.
Once the bottom is secure, frost the top of the bottom layer and attach the top layer to the bottom layer. Then begin frosting the top and outside of the cake.

As you can see, frosting the cake is not a neat or tidy process! I usually just go for it and then clean up the plate (and my hands) once I’m completely finished frosting.
Use a warm, damp paper towel to wipe the frosting off of the cake plate. Then come back with a dry paper towel to dry the plate!

Remove the Nativity Cake Topper from the Freezer
Once the cake is frosted, remove the hardened chocolate nativity scene from the freezer. Remove the tape and gently lift the waxed paper away from the chocolate.

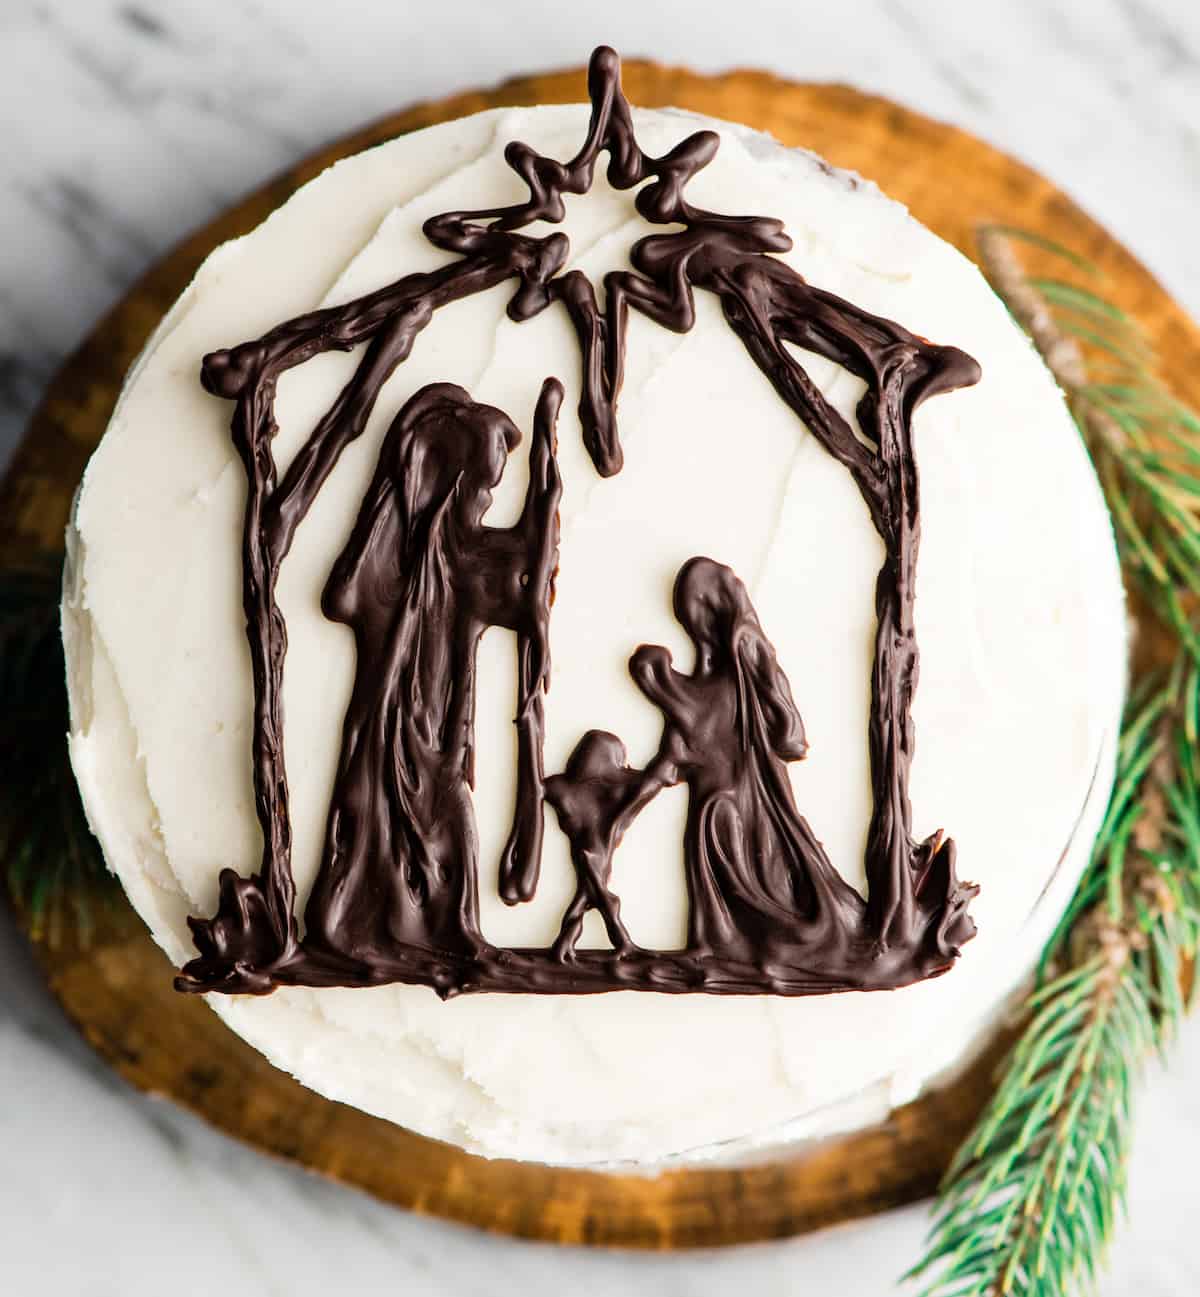
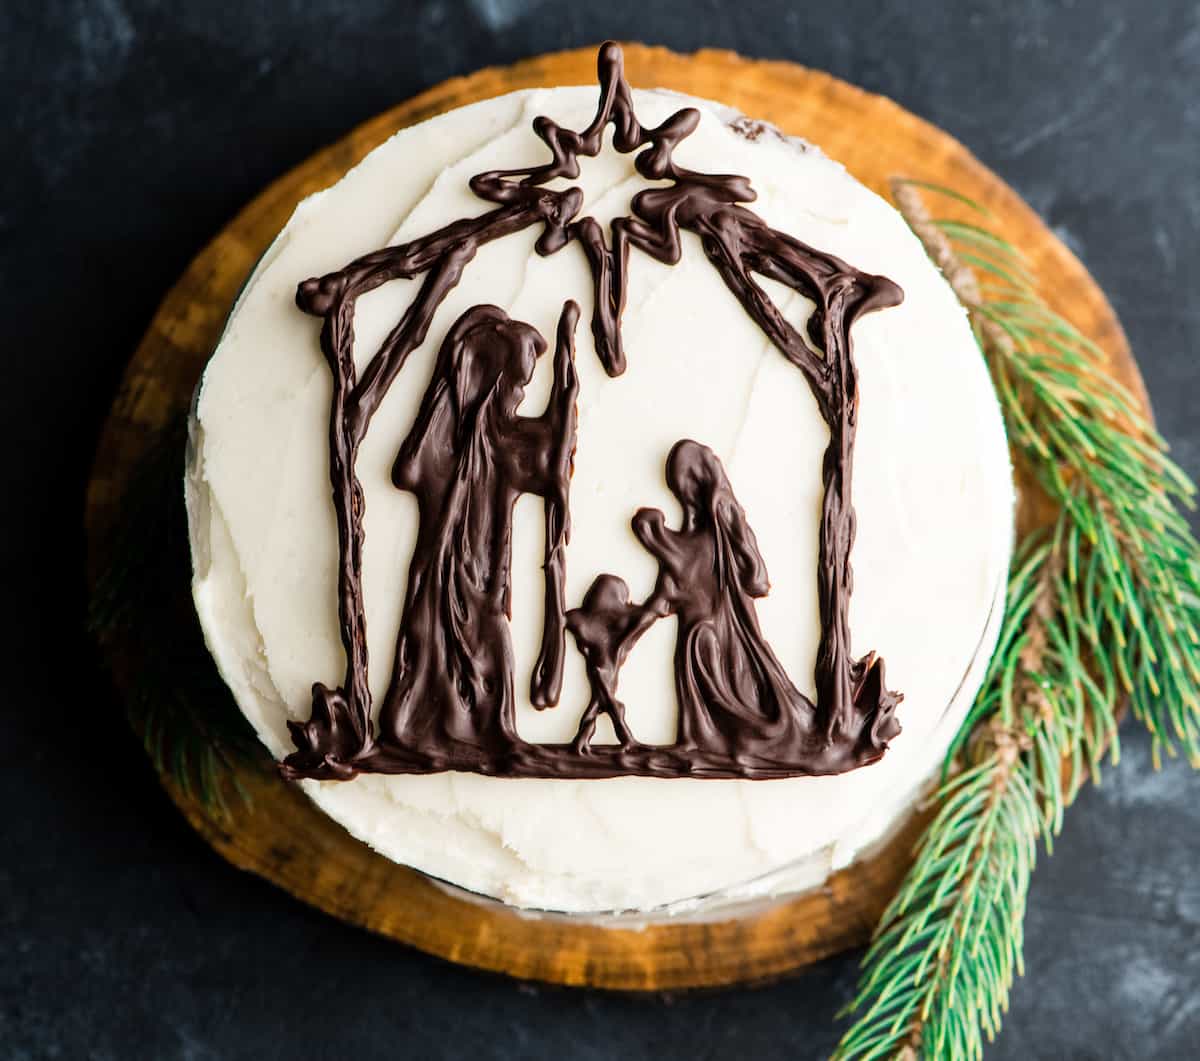
Put the Nativity Scene on the Cake & Decorate
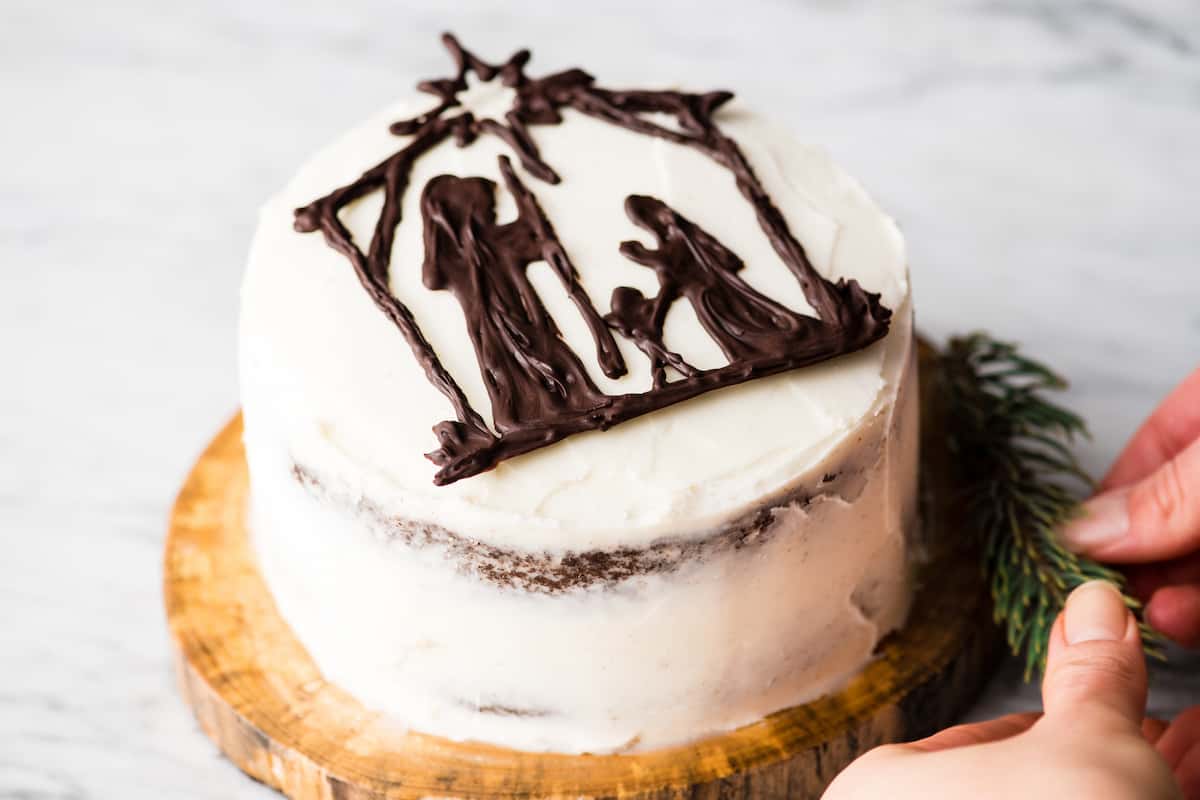
Try not to handle the chocolate too much to prevent it from melting. As soon as you remove the waxed paper, set the chocolate nativity scene onto the top of the cake.
It’s important to get the placing of the topper how you want it on the first try, because it is very difficult to take it off and put it back on. Gently press the scene onto the cake so it stays in place. Once again it’s important to be very careful so you do not crack the chocolate!
I like to add a few fresh sprigs of pine or holly around the cake to add to the rustic, festive look! However feel free to add sprinkles, chocolate designs, etc.
A Christ-Centered Christmas
I’ve been wanting to write about this topic since we started this blog a few years ago. Ever since Bethany was born, we have been trying to figure out ways to keep the Christmas season focused on the incarnation of God in the person of Jesus.
This can be tricky, especially if some of your traditions and choices do not coincide with mainstream culture. However, I want to encourage any parents (or future parents) reading this that you need to do what is right for your family. Let judgement roll off your back, and be careful not to dole it out to others who don’t celebrate the way you do!
So here’s a list of ways that we try to celebrate a Christ-centered Christmas:
- Read a book made for the Advent Season. This is one of my favorite things that we do to keep the focus on Christ during this season. Last year we read the book Jotham’s Journey and every single page had our entire family riveted. Ritch would read a chapter out loud every night after dinner, and even I would beg him to keep reading once the chapter ended! There are a few books in the same series, so this year we’re reading Bartholomew’s Passage! I love this tradition because it brings our family together every night to learn about the birth of Jesus!
- Ditch the Jolly old man in the big red suit. It’s true, we have never done the Santa thing with our kids. We hold no judgement for people who do, but we made the choice before Bethany was born that we wouldn’t. We feel very strongly about always and only ever telling our children the truth. Even when they ask hard questions, we always try to give them age-appropriate answers. So telling them that a man flies around the world in one night and brings them presents is completely contrary to the way we want to raise our family. However, we let them watch Christmas movies, read books about Santa and even take them to sit on his lap at the mall. We just tell them he is a character, much like Elsa or Captain America, and that it’s Mom and Dad who put the gifts under the tree. This has not, in any way shape or form, detracted from the anticipation, joy or fun of the season for our family! I love this quote from John Piper, “Why would we give them Santa Claus when they can have the incarnation of the Son of God? It is just mind boggling to me that we would divert attention away from the incarnation of the God of the universe into this world to save us and our children. Not only is Santa Claus not true and Jesus is very truth himself, but compared to Jesus, Santa is simply pitiful and our kids should be helped to see this.“ Click here to read/listen to the entire episode on this topic from John Piper…one of my favorites and a very good explanation of why we made our decision!
- Minimize Presents. I know this is tricky, especially when grandparents are involved. But our ideal Christmas would be our kids each receiving 3 gifts, just like Jesus did. We have tried to ask our families to spoil our kids on their birthdays, not on Jesus’. Ultimately we cannot control how many gifts they send, but we can (and have) limited what we let them open on Christmas morning.
- Have a birthday party for Jesus! We treat Christmas day like Jesus’ birthday party! We make Him a cake, and sing happy birthday to Him, and thank God for sending his Son to save the World. I have a good friend who even decorates their tree with birthday party items (hats, blowers, balloons, etc.) and I love that idea!
- Keep it Word-Centered. We give the kids books and toys (like this Nativity set), that explain the meaning of Christmas from a word-centered approach. We bring scripture in at every turn, and teach them that no matter what presents there are under the tree on Christmas morning, Jesus is the best gift they have ever and will ever receive!
True story: the other day Gabe said to me, “Mom, sometimes I have so much fun on Christmas that I forget about the reincarnation of Jesus.”
I giggled a little bit, gave a thorough explanation of the difference between reincarnation and the Incarnation of Jesus, and told him it was OK to have lots of fun celebrating Jesus’ birthday.
We want Christmas to be a joy-filled, exciting time for our kids, because that’s exactly what the birth of Jesus was (and is) for the world! It’s ok if they don’t sit silently contemplating the weight of God becoming a man, that’s not our goal.
We just hope that if they’re ever in a situation where someone asks, “What’s the first thing that comes to your mind when you think of Christmas?” Their answer is, “Jesus!”
If you make and love my recipes, it would mean so much to me if you would leave a comment and rating! And don’t forget to follow along on Instagram, Pinterest, Facebook, TikTok and Youtube – be sure to tag @joyfoodsunshine and use the hashtag #joyfoodsunshine so I can see your creations!
How to make a Birthday Cake For Jesus (Nativity Cake)
Video
Equipment
Ingredients
Ingredients
- 1 Chocolate Cake (6" or 9" – two layers)
- Homemade Vanilla Frosting or store bought
- ¾ cup semisweet chocolate melted
Equipment:
- Wilton Round Decorating Tip #7
- Decorator Bag
- Tip Couplers
- Nativity Scene Printable
- Flat Small Cookie Sheet or Cutting Board
- Waxed Paper
- tape
- Frosting Spatula
- Pastry Scraper
Instructions
Make the Nativity topper:
- Print out the Nativity Scene Printable, cut the paper to separate the two sizes. Choose which size you would like to use (I recommend the 5” size for a 6” cake, and 7” for a 9” cake).
- Place the printable on a flat surface (baking sheet, cutting board, piece of cardboard, etc) and cover it with waxed paper.
- Tape the waxed paper securely over the Nativity scene printable, set aside.
- Assemble a piping bag fitted with a Wilton round decorating tip #7 (or another similar sized, round decorating tip), set aside.
- Melt the chocolate chips in the microwave for 60 seconds. Stir until the chips are melted and chocolate is smooth. If necessary, return to the microwave for 30 second increments until the chocolate is melted, stirring well after each. (Alternately, you can melt the chocolate on the stovetop over medium/low heat or in a double boiler). Be careful not to heat it too warm. If the chocolate gets too warm it will be runny and you will need to let it cool slightly before the next steps.
- Pour the melted chocolate into the prepared decorating bag.
- Carefully “trace” the Nativity Scene Printable with the chocolate on the black lines, gently squeezing the melted chocolate out as you go.
- Once you have covered the entire design with chocolate, very carefully transfer the apparatus (surface, waxed paper, printable traced in chocolate) to the freezer to harden.
Frost the cake:
- Remove Cake from the freezer and frost using homemade or store bought frosting. I recommend white for the simple elegant look, but any color or flavor can be used.
Putting it together.
- Once the cake is frosted, carefully remove the nativity topper from the freezer.
- Remove the tape from the waxed paper and lift it off of the surface it was attached to.
- Gently pull away the waxed paper from the chocolate nativity scene.
- Immediately place the chocolate nativity scene onto the top of the frosted cake.
- Place the cake in the refrigerator, and be sure to remove it from the refrigerator 1-2 hours before you plan to serve it!
Nutrition
Nutrition information is automatically calculated, so should only be used as an approximation.
The links in this post are affiliate links, thank you for supporting JoyFoodSunshine.


Thank you for insightful reflections about why we celebrate Christmas.
Do you have to refrigerate?
No, but it helps the frosting set.
I am not planning to make your cake this year, but wanted you to know how much I enjoy each and every recipe that I make from your posts.
Have a blessed Christmas and Happy New Year!🎄
Thank you so much Rosemary!
What a genius idea for a topper!
I can’t believe I never thought of it.
Thank you so much and God bless.
Thank you Emma!
We have 4 little ones and try hard each year to keep Christmas about Jesus. I wanted a simple cake design of the nativity scene and this was perfect!! I made a sheet-pan chocolate chip cookie cake, added some buttercream frosting, then put the 7inch chocolate nativity scene on top along with Isaiah 6:9 written out in chocolate.
Everyone loved it and it helped my kiddos visualize the birth of Jesus and remember how special Christmas truly is.
Thanks so much for this wonderful idea! This will definitely become a new tradition in our house!
Each year I have a birthday party for Jesus for my Sunday School students. This would be perfect! Thank you for sharing your talents!